Introduction
The crosvm project is a hosted (a.k.a. type-2) virtual machine monitor similar to QEMU-KVM or VirtualBox.
It is a VMM that can run untrusted operating systems in a sandboxed environment. crosvm focuses on safety first and foremost, both in its language of choice (Rust) and through its runtime sandbox system. Each virtual device (disk, network, etc) is by default executed inside a minijail sandbox, isolated from the rest. In case of an exploit or vulnerability, this sandbox prevents an attacker from escaping and doing harmful things to the host operating system. On top of that, crosvm also relies on a syscall security policy that prevents unwanted system calls from being executed by a compromised device.
Initially it was intended to be used with KVM and Linux, but it now also supports other types of platforms.
To run crosvm all that is needed is an operating system image (a root file system plus a kernel) and crosvm will run it through the platform's hypervisor. See the example usage page to get started or visit the building crosvm section to compile your own from source.
- Announcements
- Developer Mailing List
- #crosvm on matrix.org
- Source code
- GitHub mirror
- API documentation, useful for searching API.
- Files for this book are under /docs/.
- Public issue tracker
- For Googlers: See go/crosvm#filing-bugs.
![]()
Building Crosvm
This chapter describes how to build crosvm on each host OS:
Pre-requisite: install Rust.
If you are targeting ChromeOS, please see Integration.
Building Crosvm on Linux
This page describes how to build and develop crosvm on linux. If you are targeting ChromeOS, please see Integration
Checking out
Obtain the source code via git clone.
git clone https://chromium.googlesource.com/crosvm/crosvm
Setting up the development environment
Crosvm uses submodules to manage external dependencies. Initialize them via:
git submodule update --init
It is recommended to enable automatic recursive operations to keep the submodules in sync with the
main repository (but do not push them, as that can conflict with repo):
git config submodule.recurse true
git config push.recurseSubmodules no
Crosvm development best works on Debian derivatives. We provide a script to install the necessary packages on Debian, Ubuntu or gLinux:
./tools/setup
For other systems, please see below for instructions on Using the development container.
Using the development container
We provide a Debian container with the required packages installed. With Podman or Docker installed, it can be started with:
NOTE: to use podman, you will need to install passt.
sudo apt install passt
KVM access on Linux systems is typically managed via supplemental user groups. To access KVM from inside the development container on such systems podman has to use 'crun' runtime. This runtime supports preserving user's supplemental groups when starting a container.
sudo apt install crun
./tools/dev_container
The container image is big and may take a while to download when first used. Once started, you can follow all instructions in this document within the container shell.
Instead of using the interactive shell, commands to execute can be provided directly:
./tools/dev_container cargo build
Note: The container and build artifacts are preserved between calls to ./tools/dev_container. If
you wish to start fresh, use the --clean flag.
Building a binary
If you simply want to try crosvm, run cargo build. Then the executable is generated at
./target/debug/crosvm. In case you are using development container, the executable will be inside
the dev container at /scratch/cargo_target/debug/crosvm.
Now you can move to Example Usage.
If you want to enable additional features, use the --features
flag. (e.g. cargo build --features=gdb)
Development
Running all tests
Crosvm's integration tests have special requirements for execution (see Testing), so we use a special test runner. By default it will only execute unit tests:
./tools/run_tests
To execute integration tests as well, you need to specify a device-under-test (DUT). The most reliable option is to use the built-in VM for testing:
./tools/run_tests --dut=vm
However, you can also use your local host directly. Your mileage may vary depending on your host kernel version and permissions.
./tools/run_tests --dut=host
Since we have some architecture-dependent code, we also have the option of running unit tests for aarch64, riscv64, and windows (mingw64). These will use an emulator to execute (QEMU or wine):
./tools/run_tests --platform=aarch64
./tools/run_tests --platform=riscv64
./tools/run_tests --platform=mingw64
When working on a machine that does not support cross-compilation (e.g. gLinux), you can use the dev container to build and run the tests.
./tools/dev_container ./tools/run_tests --platform=aarch64
Presubmit checks
To verify changes before submitting, use the presubmit script. To ensure the toolchains for all
platforms are available, it is recommended to run it inside the dev container.
./tools/dev_container ./tools/presubmit
This will run clippy, formatters and runs all tests for all platforms. The same checks will also be
run by our CI system before changes are merged into main.
See tools/presumit -h for details on various options for selecting which checks should be run to
trade off speed and accuracy.
Cross-compilation
Crosvm is built and tested on x86, aarch64, and riscv64. Your system needs some setup work to be able to cross-compile for other architectures, hence it is recommended to use the development container, which will have everything configured.
Note: Cross-compilation is not supported on gLinux. Please use the development container.
Enable foreign architectures
Your host needs to be set up to allow installation of foreign architecture packages.
On Debian this is as easy as:
sudo dpkg --add-architecture arm64
sudo dpkg --add-architecture riscv64
sudo apt update
On ubuntu this is a little harder and needs some manual modifications of APT sources.
With that enabled, the following scripts will install the needed packages:
./tools/setup-aarch64
./tools/setup-riscv64
Configuring wine and mingw64
Crosvm is also compiled and tested on windows. Some limited testing can be done with mingw64 and wine on linux machines. Use the provided setup script to install the needed dependencies.
./tools/setup-mingw64
Configure cargo for cross-compilation
Cargo requries additional configuration to support cross-compilation. You can copy the provided example config to your cargo configuration:
cat .cargo/config.debian.toml >> ${CARGO_HOME:-~/.cargo}/config.toml
Note
In case of cross-compilation, crosvm executable would be at ./target/debug/<target>/crosvm. If
cross-compiling inside development container, the executable would be inside dev container at
/scratch/cargo_target/<target>/debug/crosvm.
e.g For aarch64, target will be aarch64-unknown-linux-gnu and you can build using
cargo build --target aarch64-unknown-linux-gnu
Known issues
- Devices can't be jailed if
/var/emptydoesn't exist.sudo mkdir -p /var/emptyto work around this for now. - You need read/write permissions for
/dev/kvmto run tests or other crosvm instances. Usually it's owned by thekvmgroup, sosudo usermod -a -G kvm $USERand then log out and back in again to fix this. - Some other features (networking) require
CAP_NET_ADMINso those usually need to be run as root.
Building Crosvm on Windows
This page describes how to build and develop crosvm on windows. If you are targeting linux, please see Building Crosvm on linux
NOTE: Following instruction assume that
- git is installed and
gitcommand exists in yourEnv:PATH - the commands are run in powershell
Create base directory - C:\src
mkdir C:\src
cd C:\src
Checking out
Obtain the source code via git clone.
git clone https://chromium.googlesource.com/crosvm/crosvm
Setting up the development environment
Crosvm uses submodules to manage external dependencies. Initialize them via:
cd crosvm
git submodule update --init
It is recommended to enable automatic recursive operations to keep the submodules in sync with the
main repository (But do not push them, as that can conflict with repo):
git config submodule.recurse true
git config push.recurseSubmodules no
install-deps.ps1 install the necessary tools needed to build crosvm on windows. In addition to
installing the scripts, the script also sets up environment variables.
The below script may prompt you to install msvc toolchain via Visual Studio community edition.
Set-ExecutionPolicy Unrestricted -Scope CurrentUser
./tools/install-deps.ps1
NOTE: Above step sets up enviroment variables. You may need to either start a new powershell session or reload the environemnt variables,
Build crosvm
cargo build --features all-msvc64,whpx
Running Crosvm
This chapter includes instructions on how to run crosvm.
- Example Usage: Functioning examples to get started.
- Advanced Usage: Details on how to enable and configure features and devices of crosvm.
- Custom Kernel / Rootfs: Instructions on how to build a kernel and rootfs for crosvm.
- Options: How to specify command-line options.
- System Requirements: Host and guest requirements for running crosvm
- Features: Feature flags available when building crosvm
Example Usage
This section will explain how to use a prebuilt Ubuntu image as the guest OS. If you want to prepare a kernel and rootfs by yourself, please see Custom Kernel / Rootfs.
The example code for this guide is available in tools/examples
Run a simple Guest OS (using virt-builder)
To run a VM with crosvm, we need two things: A kernel binary and a rootfs. You can build those yourself or use prebuilt cloud/vm images that some linux distributions provide.
Preparing the guest OS image
One of the more convenient ways to customize these VM images is to use virt-builder from the
libguestfs-tools package.
    # Build a simple ubuntu image and create a user with no password.
    virt-builder ubuntu-20.04 \
        --run-command "useradd -m -g sudo -p '' $USER ; chage -d 0 $USER" \
        -o ./rootfs
    # Packages can be pre-installed to the image using
    # --install PACKAGE_NAME
    # Ex: virt-builder ubuntu-20.04 ... --install openssh-server,ncat
    # In this example, the ubuntu image will come pre-installed with OpenSSH-server and with Ncat.
Extract the Kernel (And initrd)
Crosvm directly runs the kernel instead of using the bootloader. So we need to extract the kernel binary from the image. virt-builder has a tool for that:
virt-builder --get-kernel ./rootfs -o .
The kernel binary is going to be saved in the same directory.
Note: Most distributions use an init ramdisk, which is extracted at the same time and needs to be passed to crosvm as well.
Add the user to the kvm group
To run crosvm without sudo, the user should be added to the kvm group in order to obtain the
access to the /dev/kvm file. If the user is already in the kvm group, skip this part. Otherwise,
execute the command below.
sudo adduser "$USER" kvm
You can check if the user is in the kvm group or not with the following command:
groups | grep kvm
After executing the adduser command above, please logout and log back in to reflect the kvm group.
Launch the VM
With all the files in place, crosvm can be run:
# Create `/var/empty` where crosvm can do chroot for jailing each virtio device.
# Devices can't be jailed if /var/empty doesn't exist.
# You can change this directory(/var/empty) by setting the environment variable: DEFAULT_PIVOT_ROOT
sudo mkdir -p /var/empty
# Run crosvm.
# The rootfs is an image of a partitioned hard drive, so we need to tell
# the kernel which partition to use (vda5 in case of ubuntu-20.04).
cargo run --no-default-features -- run \
    --rwdisk ./rootfs \
    --initrd ./initrd.img-* \
    -p "root=/dev/vda5" \
    ./vmlinuz-*
The full source for this example can be executed directly:
./tools/examples/example_simple
The login username will be the username on the host, and it will prompt to decide the password on the first login in the VM.
Add Networking Support
Networking support is easiest set up with a TAP device on the host, which can be done with:
./tools/examples/setup_network
The script will create a TAP device called crosvm_tap and sets up routing. For details, see the
instructions for network devices.
With the crosvm_tap in place we can use it when running crosvm:
# Use the previously configured crosvm_tap device for networking.
cargo run -- run \
    --rwdisk ./rootfs \
    --initrd ./initrd.img-* \
    --net tap-name=crosvm_tap \
    -p "root=/dev/vda5" \
    ./vmlinuz-*
To use the network device in the guest, we need to assign it a static IP address. In our example guest this can be done via a netplan config:
First, create a guest directory and the netplan config:
mkdir guest/
touch guest/01-netcfg.yaml
Then edit guest/01-netcfg.yaml and add the following contents:
# Configure network with static IP 192.168.10.2

network:
    version: 2
    renderer: networkd
    ethernets:
        enp0s4:
            addresses: [192.168.10.2/24]
            nameservers:
                addresses: [8.8.8.8]
            gateway4: 192.168.10.1
The netplan config can be installed when building the VM image:
    builder_args=(
        # Create user with no password.
        --run-command "useradd -m -g sudo -p '' $USER ; chage -d 0 $USER"

        # Configure network via netplan config in 01-netcfg.yaml
        --hostname crosvm-test
        # $SRC=/path/to/crosvm
        --copy-in "$SRC/guest/01-netcfg.yaml:/etc/netplan/"

        # Install sshd.
        --install openssh-server

        -o rootfs
    )

    # Inject authorized key for the user.
    # If the SSH RSA public key file is missing, you will need to login to
    # the VM the first time and change passwords before you can login via SSH.
    ID_RSA_PUB="$HOME/.ssh/id_rsa.pub"
    if [ -r "${ID_RSA_PUB}" ]; then
        builder_args+=("--ssh-inject" "${USER}:file:${ID_RSA_PUB}")
    fi
    virt-builder ubuntu-20.04 "${builder_args[@]}"
This also allows us to use SSH to access the VM. The script above will install your
~/.ssh/id_rsa.pub into the VM, so you'll be able to SSH from the host to the guest with no
password:
ssh 192.168.10.2
WARNING: If you are on a gLinux machine, then you will need to disable Corp SSH Helper:
ssh -oProxyCommand=none 192.168.10.2
The full source for this example can be executed directly:
./tools/examples/example_network
Add GUI support
First you'll want to add some desktop environment to the VM image:
    builder_args=(
        # Create user with no password.
        --run-command "useradd -m -g sudo -p '' $USER ; chage -d 0 $USER"

        # Configure network. See ./example_network
        --hostname crosvm-test
        --copy-in "$SRC/guest/01-netcfg.yaml:/etc/netplan/"

        # Install a desktop environment to launch
        --install xfce4

        -o rootfs
    )
    virt-builder ubuntu-20.04 "${builder_args[@]}"
Then you can use the --gpu argument to specify how gpu output of the VM should be handled. In this
example we are using the virglrenderer backend and output into an X11 window on the host.
# Enable the GPU and keyboard/mouse input. Since this will be a much heavier
# system to run we also need to increase the cpu/memory given to the VM.
# Note: GDM does not allow you to set your password on first login, you have to
#       log in on the command line first to set a password.
cargo run --features=gpu,x,virgl_renderer -- run \
    --cpus 4 \
    --mem 4096 \
    --gpu backend=virglrenderer,width=1920,height=1080 \
    --display-window-keyboard \
    --display-window-mouse \
    --net tap-name=crosvm_tap \
    --rwdisk ./rootfs \
    --initrd ./initrd.img-* \
    -p "root=/dev/vda5" \
    ./vmlinuz-*
The full source for this example can be executed directly (Note, you may want to run setup_networking first):
./tools/examples/example_desktop
Advanced Usage
To see the usage information for your version of crosvm, run crosvm or crosvm run --help.
Specify log levels
To change the log levels printed while running crosvm:
crosvm --log-level=LEVEL run
Ex:
crosvm --log-level=debug run
To change the log levels printed for a specific module:
crosvm --log-level=devices::usb::xhci=LEVEL run
Those can be combined to print different log levels for modules and for crosvm:
crosvm --log-level=devices::usb::xhci=LEVEL1,LEVEL2 run
Where LEVEL1 will be applied to the module "devices::usb::xhci" and LEVEL2 will be applied to the rest of crosvm.
Available LEVELs: off, error, warn, info (default), debug, trace (only available in debug builds).
Note: Logs will print all logs of the same or lower level. Ex: info will print error + warn + info.
Boot a Kernel
To run a very basic VM with just a kernel and default devices:
crosvm run "${KERNEL_PATH}"
The compressed kernel image, also known as bzImage, can be found in your kernel build directory in
the case of x86 at arch/x86/boot/bzImage.
Rootfs
With a disk image
In most cases, you will want to give the VM a virtual block device to use as a root file system:
crosvm run -b "${ROOT_IMAGE},root,ro" "${KERNEL_PATH}"
The root image must be a path to a disk image formatted in a way that the kernel can read. Typically
this is a squashfs image made with mksquashfs or an ext4 image made with mkfs.ext4. By
specifying the root flag, the kernel is automatically told to use that image as the root, and
therefore it can only be given once. The ro flag also makes the disk image read-only for the
guest. More disks images can be given with -b or --block if needed.
To run crosvm with a writable rootfs, just remove the ro flag from the command-line above.
WARNING: Writable disks are at risk of corruption by a malicious or malfunctioning guest OS.
Without the root flag, mounting a disk image as the root filesystem requires to pass the
corresponding kernel argument manually using the -p option:
crosvm run --block "${ROOT_IMAGE}" -p "root=/dev/vda" bzImage
NOTE: If more disks arguments are added prior to the desired rootfs image, the
root=/dev/vdamust be adjusted to the appropriate letter.
With virtiofs
Linux kernel 5.4+ is required for using virtiofs. This is convenient for testing. Note kernels before 5.15 require the file system to be named "mtd*" or "ubi*". See discussions and a patch for the details.
crosvm run --shared-dir "/:mtdfake:type=fs:cache=always" \
    -p "rootfstype=virtiofs root=mtdfake" bzImage
Device emulation
Crosvm supports several emulated devices and 15+ types of virtio devices. See "Device" chapter for the details.
Control Socket
If the control socket was enabled with -s, the main process can be controlled while crosvm is
running. To tell crosvm to stop and exit, for example:
NOTE: If the socket path given is for a directory, a socket name underneath that path will be generated based on crosvm's PID.
crosvm run -s /run/crosvm.sock ${USUAL_CROSVM_ARGS}
    <in another shell>
crosvm stop /run/crosvm.sock
WARNING: The guest OS will not be notified or gracefully shutdown.
This will cause the original crosvm process to exit in an orderly fashion, allowing it to clean up any OS resources that might have stuck around if crosvm were terminated early.
Multiprocess Mode
By default crosvm runs in multiprocess mode. Each device that supports running inside of a sandbox
will run in a jailed child process of crosvm. The sandbox can be disabled for testing with the
--disable-sandbox option.
GDB Support
crosvm supports GDB Remote Serial Protocol to allow developers to debug guest kernel via GDB (x86_64 or AArch64 only).
You can enable the feature by --gdb flag:
# Use uncompressed vmlinux
crosvm run --gdb <port> ${USUAL_CROSVM_ARGS} vmlinux
Then, you can start GDB in another shell.
gdb vmlinux
(gdb) target remote :<port>
(gdb) hbreak start_kernel
(gdb) c
<start booting in the other shell>
For general techniques for debugging the Linux kernel via GDB, see this kernel documentation.
Defaults
The following are crosvm's default arguments and how to override them.
- 256MB of memory (set with
-m) - 1 virtual CPU (set with
-c) - no block devices (set with
-b,--block) - no network device (set with
--net) - only the kernel arguments necessary to run with the supported devices (add more with
-p) - run in multiprocess mode (run in single process mode with
--disable-sandbox) - no control socket (set with
-s)
Exit code
Crosvm will exit with a non-zero exit code on failure.
See CommandStatus for meaning of the major exit codes.
Hypervisor
The default hypervisor back can be overriden using --hypervisor=<backend>.
The available backends are:
- On Linux: "kvm"
- On Windows: "whpx", "haxm", "ghaxm", "gvm"
See the "Hypervisors" chapter for more information.
Custom Kernel / Rootfs
This document explains how to build a custom kernel and use debootstrap to build a rootfs for running crosvm.
For an easier way to get started with prebuilt images, see Example Usage
Build a kernel
The linux kernel in chromiumos comes preconfigured for running in a crosvm guest and is the easiest to build. You can use any mainline kernel though as long as it's configured for para-virtualized (virtio) devices
If you are using the chroot for ChromiumOS development, you already have the kernel source. Otherwise, you can clone it:
git clone --depth 1 -b chromeos-6.6 https://chromium.googlesource.com/chromiumos/third_party/kernel
Either way that you get the kernel, the next steps are to configure and build the bzImage:
cd kernel
CHROMEOS_KERNEL_FAMILY=termina ./chromeos/scripts/prepareconfig container-vm-x86_64
make olddefconfig
make -j$(nproc) bzImage
This kernel does not build any modules, nor does it support loading them, so there is no need to worry about an initramfs, although they are supported in crosvm.
Build a rootfs disk
This stage enjoys the most flexibility. There aren't any special requirements for a rootfs in
crosvm, but you will at a minimum need an init binary. This could even be /bin/bash if that is
enough for your purposes. To get you started, a Debian rootfs can be created with debootstrap.
Make sure to define $CHROOT_PATH.
truncate -s 20G debian.ext4
mkfs.ext4 debian.ext4
mkdir -p "${CHROOT_PATH}"
sudo mount debian.ext4 "${CHROOT_PATH}"
sudo debootstrap stable "${CHROOT_PATH}" http://deb.debian.org/debian/
sudo chroot "${CHROOT_PATH}"
passwd
echo "tmpfs /tmp tmpfs defaults 0 0" >> /etc/fstab
echo "tmpfs /var/log tmpfs defaults 0 0" >> /etc/fstab
echo "tmpfs /root tmpfs defaults 0 0" >> /etc/fstab
echo "sysfs /sys sysfs defaults 0 0" >> /etc/fstab
echo "proc /proc proc defaults 0 0" >> /etc/fstab
exit
sudo umount "${CHROOT_PATH}"
Note: If you run crosvm on a testing device (e.g. Chromebook in Developer mode), another option is to share the host's rootfs with the guest via virtiofs. See the virtiofs usage.
You can simply create a disk image as follows:
fallocate --length 4G disk.img
mkfs.ext4 ./disk.img
Command line options
Command-line options generally take a set of key-value pairs separated by the comma (,) character.
The acceptable key-values for each option can be obtained by passing the --help option to a crosvm
command:
crosvm run --help
...
  -b, --block       parameters for setting up a block device.
                    Valid keys:
                        path=PATH - Path to the disk image. Can be specified
                            without the key as the first argument.
                        ro=BOOL - Whether the block should be read-only.
                            (default: false)
                        root=BOOL - Whether the block device should be mounted
                            as the root filesystem. This will add the required
                            parameters to the kernel command-line. Can only be
                            specified once. (default: false)
                        sparse=BOOL - Indicates whether the disk should support
                            the discard operation. (default: true)
                        block-size=BYTES - Set the reported block size of the
                            disk. (default: 512)
                        id=STRING - Set the block device identifier to an ASCII
                            string, up to 20 characters. (default: no ID)
                        direct=BOOL - Use O_DIRECT mode to bypass page cache.
                            (default: false)
...
From this help message, we see that the --block or -b option accepts the path, ro, root,
sparse, block-size, id, and direct keys. Keys which default value is mentioned are optional,
which means only the path key must always be specified.
One example invocation of the --block option could be:
--block path=/path/to/bzImage,root=true,block-size=4096
Keys taking a boolean parameters can be enabled by specifying their name witout any value, so the previous option can also be written as
--block path=/path/to/bzImage,root,block-size=4096
Also, the name of the first key can be entirely omitted, which further simplifies our option as:
--block /path/to/bzImage,root,block-size=4096
System Requirements
Linux
A Linux 4.14 or newer kernel with KVM support (check for /dev/kvm) is required to run crosvm. In
order to run certain devices, there are additional system requirements:
virtio-wayland- A Wayland compositor.vsock- Host Linux kernel with vhost-vsock support.multiprocess- Host Linux kernel with seccomp-bpf and Linux namespacing support.virtio-net- Host Linux kernel with TUN/TAP support (check for/dev/net/tun) and running withCAP_NET_ADMINprivileges.
Features
Feature flags of the crosvm crate control which features are included in the binary. These
features can be enabled using Cargo's --features flag. Some features are enabled by default unless
the Cargo --no-default-features flag is specified. See the crosvm crate documentation for
details.
Programmatic Interaction Using the crosvm_control Library
Usage
crosvm_control
provides a programmatic way to interface with crosvm as a substitute to the CLI.
The library itself is written in Rust, but a C/C++ compatible header (crosvm_control.h) is
generated during the crosvm build and emitted to the Rust OUT_DIR.
(See the build.rs
script for more information).
The best practice for using crosvm_control from your project is to exclusively use the
crosvm_control.h generated by the crosvm build. This ensures that there will never be a runtime
version mismatch between your project and crosvm. Additionally, this will allow for build-time
checks against the crosvm API.
During your project's build step, when building the crosvm dependency, the emitted
crosvm_control.h should be installed to your project's include dir - overwriting the old version
if present.
Changes
As crosvm_control is a externally facing interface to crosvm, great care must be taken when
updating the API surface. Any breaking change to a crosvm_control entrypoint must be handled the
same way as a breaking change to the crosvm CLI.
As a general rule, additive changes (such as adding new fields to the end of a struct, or adding a
new API) are fine and should be integrated correctly with downstream projects so long as those
projects follow the usage best practices. Changes that change the signature of any existing
crosvm_control function will cause problems downstream and should be considered a breaking change.
(ChromeOS Developers Only)
For ChromeOS, it is possible to integrate a breaking change from upstream crosvm, but it should be avoided if at all possible. See here for more information.
Testing
Crosvm runs on a variety of platforms with a significant amount of platform-specific code. Testing on all the supported platforms is crucial to keep crosvm healthy.
Types of tests
Unit Tests
Unit tests are your standard rust tests embedded with the rest of the code in src/ and wrapped in
a #[cfg(test)] attribute.
Unit tests cannot make any guarantees on the runtime environment. Avoid doing the following in unit tests:
- Avoid kernel features such as io_uring or userfaultfd, which may not be available on all kernels.
- Avoid functionality that requires privileges (e.g. CAP_NET_ADMIN)
- Avoid spawning threads or processes
- Avoid accessing kernel devices
- Avoid global state in unit tests
This allows us to execute unit tests for any platform using emulators such as qemu-user-static or wine64.
File Access in Unit Tests
Some unit tests may need to access extra data files. The files should be accessed at build time
using include_str!() macro, rather than at run time. The file is located relative to the current
file (similarly to how modules are found). The contents of the file can be used directly in the test
or at runtime the test can write this data to a temporary file. This approach is crucial because
certain test environment may require to run the test binaries directly without access to the source
code. Additionally, it ensures the test binary can be run manually within a debugger like GDB.
These approaches ensure that units tests be able to find the correct paths in various build & execution environment.
Example:
#![allow(unused)]
fn main() {
#[test]
fn test_my_config() {
    let temp_file = TempDir::new().unwrap();
    let path = temp_file.path().join("my_config.cfg");
    let test_config = include_str!("../../../data/config/my_config.cfg");
    fs::write(&path, test_config).expect("Unable to write test file");
    let config_file = File::open(path).expect("Failed to open config file");
    // ... rest of your test ...
}
}
Documentation tests
Rust's documentation tests can be used to provide examples as part of the documentation that is verified by CI.
Documentation tests are slow and not run as part of the usual workflows, but can be run locally with:
./tools/presubmit doc_tests
Integration tests
Cargo has native support for
integration testing.
Integration tests are written just like unit tests, but live in a separate directory at tests/.
Integration tests guarantee that the test has privileged access to the test environment. They are only executed when a device-under-test (DUT) is specified when running tests:
./tools/run_tests --dut=vm|host
End To End (E2E) tests
End to end tests live in the e2e_tests crate. The crate provides a framework to boot a guest with
crosvm and execut commands in the guest to validate functionality at a high level.
E2E tests are executed just like integration tests. By giving nextest's filter expressions, you can run a subset of the tests.
# Run all e2e tests
./tools/run_tests --dut=vm --filter-expr 'package(e2e_tests)'
# Run e2e tests whose name contains the string 'boot'.
./tools/run_tests --dut=vm --filter-expr 'package(e2e_tests) and test(boot)'
Downstream Product tests
Each downstream product that uses crosvm is performing their own testing, e.g. ChromeOS is running high level testing of its VM features on ChromeOS hardware, while AOSP is running testing of their VM features on AOSP hardware.
Upstream crosvm is not involved in these tests and they are not executed in crosvm CI.
Parallel test execution
Crosvm tests are executed in parallel, each test case in its own process via cargo nextest.
This requires tests to be cautious about global state, especially integration tests which interact with system devices.
If you require exclusive access to a device or file, you have to use file-based locking to prevent access by other test processes.
Platforms tested
The platforms below can all be tested using tools/run_tests -p $platform. The table indicates how
these tests are executed:
| Platform | Build | Unit Tests | Integration Tests | E2E Tests |
|---|---|---|---|---|
| x86_64 (linux) | ✅ | ✅ | ✅ | ✅ |
| aarch64 (linux) | ✅ | ✅ (qemu-user1) | ✅ (qemu2) | ❌ |
| mingw643 (linux) | 🚧 | 🚧 (wine64) | ❌ | ❌ |
| mingw643 (windows) | 🚧 | 🚧 | 🚧 | ❌ |
Crosvm CI will use the same configuration as tools/run_tests.
Debugging Tips
Here are some tips for developing or/and debugging crosvm tests.
Enter a test VM to see logs
When you run a test on a VM with ./tools/run_tests --dut=vm, if the test fails, you'll see
extracted log messages. To see the full messages or monitor the test process during the runtime, you
may want to enter the test VM.
First, enter the VM's shell and start printing the syslog:
$ ./tools/dev_container # Enter the dev_container
$ ./tools/x86vm shell   # Enter the test VM
crosvm@testvm-x8664:~$ journalctl -f
# syslog messages will be printed...
Then, open another terminal and run a test:
$ ./tools/run_tests --dut=vm --filter-expr 'package(e2e_tests) and test(boot)'
So you'll see the crosvm log in the first terminal.
qemu-aarch64-static or qemu-arm-static translate instructions into x86 and executes them on the host kernel. This works well for unit tests, but will fail when interacting with platform specific kernel features.
run_tests will launch a VM for testing in the background. This VM is using full system emulation, which causes tests to be slow. Also not all aarch64 features are properly emulated, which prevents us from running e2e tests.
Windows builds of crosvm are a work in progress. Some tests are executed via wine64 on linux
Fuzzing
Crosvm contains several fuzz testing programs that are intended to exercise specific subsets of the code with automatically generated inputs to help uncover bugs that were not found by human-written unit tests.
The source code for the fuzzer target programs can be found in fuzz/fuzz_targets in the crosvm
source tree.
OSS-Fuzz
Crosvm makes use of the OSS-Fuzz service, which automatically builds and runs fuzzers for many open source projects. Once a crosvm change is committed and pushed to the main branch, it will be tested automatically by ClusterFuzz, and if new issues are found, a bug will be filed.
Running fuzzers locally
It can be useful to run a fuzzer in order to test new changes locally or to reproduce a bug filed by ClusterFuzz.
To build and run a specific fuzz target, install cargo fuzz, then run it in the crosvm source
tree, specifying the desired fuzz target to run. If you have a testcase provided by the automated
fuzzing infrastructure in a bug report, you can add that file to the fuzzer command line to
reproduce the same fuzzer execution rather than using randomly generating inputs.
# Run virtqueue_fuzzer with randomly-generated input.
# This will run indefinitely; it can be stopped with Ctrl+C.
cargo +nightly fuzz run virtqueue_fuzzer

# Run virtqueue_fuzzer with a specific input file from ClusterFuzz.
cargo +nightly fuzz run virtqueue_fuzzer clusterfuzz-testcase-minimized-...
Devices
This chapter describes emulated devices in crosvm. These devices work like hardware for the guest.
List of devices
Here is a (non-comprehensive) list of emulated devices provided by crosvm.
Emulated Devices
CMOS/RTC- Used to get the current calendar time.i8042- Used by the guest kernel to exit crosvm.- usb - xhci emulation to provide USB device passthrough.
serial- x86 I/O port driven serial devices that print to stdout and take input from stdin.
VirtIO Devices
balloon- Allows the host to reclaim the guest's memories.block- Basic read/write block device.console- Input and outputs on console.fs- Shares file systems over the FUSE protocol.gpu- Graphics adapter.input- Creates virtual human interface devices such as keyboards.iommu- Emulates an IOMMU device to manage DMA from endpoints in the guest.net- Device to interface the host and guest networks.p9- Shares file systems over the 9P protocol.pmem- Persistent memory.rng- Entropy source used to seed guest OS's entropy pool.scsi- SCSI device.snd- Encodes and decodes audio streams.tpm- Creates a TPM (Trusted Platform Module) device backed by vTPM daemon.video- Allows the guest to leverage the host's video capabilities.wayland- Allows the guest to use the host's Wayland socket.vsock- Enables use of virtual sockets for the guest.vhost-user- VirtIO devices which offloads the device implementation to another process through the vhost-user protocol:- frontend side: Shares its virtqueues.
- backend side: Consumes virtqueues.
Device hotplug (experimental)
A hotplug-capable device can be added as a PCI device to the guest. To enable hotplug, compile
crosvm with feature flag pci-hotplug:
cargo build --features=pci-hotplug #additional parameters
When starting the VM, specify the number of slots with --pci-hotplug-slots option. Additionally,
specify a control socket specified with -s
option for sending hotplug commands.
For example, to run a VM with 3 PCI hotplug slots and control socket:
VM_SOCKET=/run/crosvm.socket
crosvm run \
    -s ${VM_SOCKET} \
    --pci-hotplug-slots 3
    # usual crosvm args
Currently, only network devices are supported.
Block
crosvm supports virtio-block device that works as a disk for the guest.
First, create a ext4 (or whatever file system you want) disk file.
fallocate -l 1G disk.img
mkfs.ext4 disk.img
Then, pass it with --block flag so the disk will be exposed as /dev/vda, /dev/vdb, etc. The
device can be mounted with the mount command.
crosvm run \
  --block disk.img
  ... # usual crosvm args
To expose the block device as a read-only disk, you can add the ro flag after the disk image path:
crosvm run \
  --block disk.img,ro
  ... # usual crosvm args
Rootfs
If you use a block device as guest's rootfs, you can add the root flag to the --block parameter:
crosvm run \
  --block disk.img,root
  ... # usual crosvm args
This flag automatically adds a root=/dev/vdX kernel parameter with the corresponding virtio-block
device name and read-only (ro) or read-write (rw) option depending on whether the ro flag has
also been specified or not.
Options
The --block parameter support additional options to enable features and control disk parameters.
These may be specified as extra comma-separated key=value options appended to the required
filename option. For example:
crosvm run
  --block disk.img,ro,sparse=false,o_direct=true,block_size=4096,id=MYSERIALNO
  ... # usual crosvm args
The available options are documented in the following sections.
Sparse
- Syntax:
sparse=(true|false) - Default:
sparse=true
The sparse option controls whether the disk exposes the thin provisioning discard command. If
sparse is set to true, the VIRTIO_BLK_T_DISCARD request will be available, and it will be
translated to the appropriate system call on the host disk image file (for example,
fallocate(FALLOC_FL_PUNCH_HOLE) for raw disk images on Linux). If sparse is set to false, the
disk will be fully allocated at startup (using fallocate() or equivalent on other platforms),
and the VIRTIO_BLK_T_DISCARD request will not be supported for this device.
O_DIRECT
- Syntax:
o_direct=(true|false) - Default:
o_direct=false
The o_direct option enables the Linux O_DIRECT flag on the underlying disk image, indicating
that I/O should be sent directly to the backing storage device rather than using the host page
cache. This should only be used with raw disk images, not qcow2 or other formats. The block_size
option may need to be adjusted to ensure that I/O is sufficiently aligned for the host block device
and filesystem requirements.
Block size
- Syntax:
block_size=BYTES - Default:
block_size=512
The block_size option overrides the reported block size (also known as sector size) of the
virtio-block device. This should be a power of two larger than or equal to 512.
ID
- Syntax:
id=DISK_ID - Default: No identifier
The id option provides the virtio-block device with a unique identifier. The DISK_ID string must
be 20 or fewer ASCII printable characters. The id may be used by the guest environment to uniquely
identify a specific block device rather than making assumptions about block device names.
The Linux virtio-block driver exposes the disk identifer in a sysfs file named serial; an
example path looks like /sys/devices/pci0000:00/0000:00:02.0/virtio1/block/vda/serial (the PCI
address may differ depending on which other devices are enabled).
Resizing
The crosvm block device supports run-time resizing. This can be accomplished by starting crosvm with
the -s control socket, then using the crosvm disk command to send a resize request:
crosvm disk resize DISK_INDEX NEW_SIZE VM_SOCKET
DISK_INDEX: 0-based index of the block device (counting all--blockin order).NEW_SIZE: desired size of the disk image in bytes.VM_SOCKET: path to the VM control socket specified when running crosvm (-s/--socketoption).
For example:
# Create a 1 GiB disk image
truncate -s 1G disk.img

# Run crosvm with a control socket
crosvm run \
  --block disk.img,sparse=false \
  -s /tmp/crosvm.sock \
  ... # other crosvm args

# In another shell, extend the disk image to 2 GiB.
crosvm disk resize \
  0 \
  $((2 * 1024 * 1024 * 1024)) \
  /tmp/crosvm.sock

# The guest OS should recognize the updated size and log a message:
#   virtio_blk virtio1: [vda] new size: 4194304 512-byte logical blocks (2.15 GB/2.00 GiB)
The crosvm disk resize command only resizes the block device and its backing disk image. It is the
responsibility of the VM socket user to perform any partition table or filesystem resize operations,
if required.
Input
crosvm supports virtio-input devices that provide human input devices like multi-touch devices, trackpads, keyboards, and mice.
Events may be sent to the input device via a socket carrying virtio_input_event structures. On
Unix-like platforms, this socket must be a UNIX domain socket in stream mode (AF_UNIX/AF_LOCAL,
SOCK_STREAM). Typically this will be created by a separate program that listens and accepts a
connection on this socket and sends the desired events.
On Linux, it is also possible to grab an evdev device and forward its events to the guest.
The general syntax of the input option is as follows:
--input DEVICE-TYPE[KEY=VALUE,KEY=VALUE,...]
For example, to create a 1920x1080 multi-touch device reading data from /tmp/multi-touch-socket:
crosvm run \
  ...
  --input multi-touch[path=/tmp/multi-touch-socket,width=1920,height=1080]
  ...
The available device types and their specific options are listed below.
Input device types
Evdev
Linux only.
Passes an event device node into the VM. The device will be grabbed (unusable from the host) and made available to the guest with the same configuration it shows on the host.
Options:
path(required): path toevdevdevice, e.g./dev/input/event0
Example:
crosvm run \
  --input evdev[path=/dev/input/event0] \
  ...
Keyboard
Add a keyboard virtio-input device.
Options:
path(required): path to event source socket
Example:
crosvm run \
  --input keyboard[path=/tmp/keyboard-socket] \
  ...
Mouse
Add a mouse virtio-input device.
Options:
path(required): path to event source socket
Example:
crosvm run \
  --input mouse[path=/tmp/mouse-socket] \
  ...
Multi-Touch
Add a multi-touch touchscreen virtio-input device.
Options:
path(required): path to event source socketwidth(optional): width of the touchscreen in pixels (default: 1280)height(optional): height of the touchscreen in pixels (default: 1024)name(optional): device name string
If width and height are not specified, the first multi-touch input device is sized to match the
GPU display size, if specified.
Example:
crosvm run \
  ...
  --input multi-touch[path=/tmp/multi-touch-socket,width=1920,height=1080,name=mytouch2]
  ...
Rotary
Add a rotating side button/wheel virtio-input device.
Options:
path(required): path to event source socket
Example:
crosvm run \
  --input rotary[path=/tmp/rotary-socket] \
  ...
Single-Touch
Add a single-touch touchscreen virtio-input device.
Options:
path(required): path to event source socketwidth(optional): width of the touchscreen in pixels (default: 1280)height(optional): height of the touchscreen in pixels (default: 1024)name(optional): device name string
If width and height are not specified, the first single-touch input device is sized to match the
GPU display size, if specified.
Example:
crosvm run \
  ...
  --input single-touch[path=/tmp/single-touch-socket,width=1920,height=1080,name=mytouch1]
  ...
Switches
Add a switches virtio-input device. Switches are often used for accessibility, such as with the Android Switch Access feature.
Options:
path(required): path to event source socket
Example:
crosvm run \
  --input switches[path=/tmp/switches-socket] \
  ...
Trackpad
Add a trackpad virtio-input device.
Options:
path(required): path to event source socketwidth(optional): width of the touchscreen in pixels (default: 1280)height(optional): height of the touchscreen in pixels (default: 1024)name(optional): device name string
Example:
crosvm run \
  ...
  --input trackpad[path=/tmp/trackpad-socket,width=1920,height=1080,name=mytouch1]
  ...
Custom
Add a custom virtio-input device.
path(required): path to event source socketconfig-path(required): path to file configuring device
crosvm run \
  --input custom[path=/tmp/keyboard-socket,config-path=/tmp/custom-keyboard-config.json] \
  ...
This config_path requires a JSON-formatted configuration file. "events" configures the supported events. "name" defines the customized device name, "serial" defines customized serial name, "properties" defines the device properties and "axis_info" defines the axis information.
An example configuration file covering all property types can be found in
/devices/tests/data/input/example_custom_multitouchscreen_config.json.
It configures a device equivalent to the default multitouch screen device
(crosvm run --input=multi-touch,...). Another example can be found in
/devices/tests/data/input/example_custom_keyboard_config.json,
which configures a device equivalent to the default keyboard (crosvm run --input=keyboard,...).
Here is a portion of the example config file:
{
          "name": "Crosvm Virtio Multitouch Touchscreen 0",
          "serial_name": "virtio-touchscreen-0",
          "properties": {"INPUT_PROP_DIRECT": 1},
          "events": [
            {
              "event_type": "EV_KEY",
              "event_type_code": 1,
              "supported_events": {
                "BTN_TOUCH": 330
              }
            }, {
          ...
            }
          ],
          "axis_info": [
            {
              "axis": "ABS_MT_SLOT",
              "axis_code": 47,
              "min": 0,
              "max": 10,
              "fuzz": 0,
              "flat": 0
            }, {
          ...
            }
          ]
        }
Network
Host TAP configuration
The most convenient way to provide a network device to a guest is to setup a persistent TAP interface on the host. This section will explain how to do this for basic IPv4 connectivity.
sudo ip tuntap add mode tap user $USER vnet_hdr crosvm_tap
sudo ip addr add 192.168.10.1/24 dev crosvm_tap
sudo ip link set crosvm_tap up
These commands create a TAP interface named crosvm_tap that is accessible to the current user,
configure the host to use the IP address 192.168.10.1, and bring the interface up.
The next step is to make sure that traffic from/to this interface is properly routed:
sudo sysctl net.ipv4.ip_forward=1
# Network interface used to connect to the internet.
HOST_DEV=$(ip route get 8.8.8.8 | awk -- '{printf $5}')
sudo iptables -t nat -A POSTROUTING -o "${HOST_DEV}" -j MASQUERADE
sudo iptables -A FORWARD -i "${HOST_DEV}" -o crosvm_tap -m state --state RELATED,ESTABLISHED -j ACCEPT
sudo iptables -A FORWARD -i crosvm_tap -o "${HOST_DEV}" -j ACCEPT
Start crosvm with network
The interface is now configured and can be used by crosvm:
crosvm run \
  ...
  --net tap-name=crosvm_tap \
  ...
Configure network in host
Provided the guest kernel had support for VIRTIO_NET, the network device should be visible and
configurable from the guest.
# Replace with the actual network interface name of the guest
# (use "ip addr" to list the interfaces)
GUEST_DEV=enp0s5
sudo ip addr add 192.168.10.2/24 dev "${GUEST_DEV}"
sudo ip link set "${GUEST_DEV}" up
sudo ip route add default via 192.168.10.1
# "8.8.8.8" is chosen arbitrarily as a default, please replace with your local (or preferred global)
# DNS provider, which should be visible in `/etc/resolv.conf` on the host.
echo "nameserver 8.8.8.8" | sudo tee /etc/resolv.conf
These commands assign IP address 192.168.10.2 to the guest, activate the interface, and route all
network traffic to the host. The last line also ensures DNS will work.
Please refer to your distribution's documentation for instructions on how to make these settings persistent for the host and guest if desired.
Device hotplug (experimental)
On a hotplug-enabled VM, a TAP device can be hotplugged
using the virtio-net command:
crosvm virtio-net add crosvm_tap ${VM_SOCKET}
Upon success, crosvm virtio_net will report the PCI bus number the device is plugged into:
[[time redacted] INFO crosvm] Tap device crosvm_tap plugged to PCI bus 3
The hotplugged device can then be configured inside the guest OS similar to a statically configured
device. (Replace ${GUEST_DEV} with the hotplugged device, e.g.: enp3s0.)
Due to sandboxing, crosvm do not have CAP_NET_ADMIN even if crosvm is started using sudo. Therefore, hotplug only accepts a persistent TAP device owned by the user running crosvm, unless sandboxing is disabled.
The device can be removed from the guest using the PCI bus number:
crosvm virtio-net remove 3 ${VM_SOCKET}
Balloon
crosvm supports virtio-balloon for managing guest memory.
How to control the balloon size
When running a VM, specify VM_SOCKET with -s option. (example: /run/crosvm.sock)
crosvm run \
    -s ${CROSVM_SOCKET} \
    # usual crosvm args
    /path/to/bzImage
Then, open another terminal and specify the balloon size in bytes with crosvm balloon command.
crosvm balloon 4096 ${CROSVM_SOCKET}
Note: The size of balloon is managed in 4096 bytes units. The specified value will be rounded down to a multiple of 4096 bytes.
You can confirm the balloon size with crosvm balloon_stats command.
crosvm balloon_stats ${CROSVM_SOCKET}
SCSI (experimental)
crosvm supports virtio-scsi devices that work as block devices for the guest.
The step for setting up a block device is similar to the virtio-blk device. After setting up the
block device, pass it with --scsi-block flag so the disk will be exposed as /dev/sda,
/dev/sdb, etc. The device can be mounted with the mount command.
crosvm run \
  --scsi-block disk.img
  ... # usual crosvm args
Flags & Options
The --scsi-block parameter supports additional options and flags to enable features and control
disk parameters.
Read-only
To expose the scsi device as a read-only disk, you can add the ro flag after the disk image path:
crosvm run \
  --scsi-block disk.img,ro
  ... # usual crosvm args
Rootfs
If you use a scsi device as guest's rootfs, you can add the root flag to the --scsi-block
parameter:
crosvm run \
  --scsi-block disk.img,root
  ... # usual crosvm args
This flag automatically adds a root=/dev/sdX kernel parameter with the corresponding virtio-scsi
device name and read-only (ro) or read-write (rw) option depending on whether the ro flag has
also been specified or not.
Block size
- Syntax:
block_size=BYTES - Default:
block_size=512
The block_size option overrides the reported block size (also known as sector size) of the
virtio-scsi device. This should be a power of two larger than or equal to 512.
Fs
Crosvm supports
virtio-fs,
a shared file system that lets virtual machines access a directory tree on the host. It allows the
guest to access files on the host machine. This section will explain how to create a shared
directory. You can also find a runnable sample in tools/examples/example_fs.
Creating a Shared Directory on the Host Machine
To create a shared directory, run the following commands in the host machine:
mkdir host_shared_dir
HOST_SHARED_DIR=$(pwd)/host_shared_dir
crosvm run \
   --shared-dir "$HOST_SHARED_DIR:my_shared_tag:type=fs" \
  ... # usual crosvm args
In the --shared-dir argument:
- The first field is the directory to be shared (
$HOST_SHARED_DIRin this example). - The second field is the tag that the VM will use to identify the device (
my_shared_tagin this example). - The remaining fields are key-value pairs configuring the shared directory.
To see available options, run crosvm run --help.
Mount the Shared Directory in the Guest OS
Next, switch to the guest OS and run the following commands to set up the shared directory:
sudo su
mkdir /tmp/guest_shared_dir
mount -t virtiofs my_shared_tag /tmp/guest_shared_dir
You can now add files to the shared directory. Any files you put in the guest_shared_dir will
appear in the host_shared_dir on the host machine, and vice versa.
Running VirtioFS as root filesystem
It is also possible to boot crosvm directly from a virtio-fs directory, as long as the directory structure matches that of a valid rootfs. The outcome is similar to running a chroot but inside a VM.
Running VMs with virtio-fs as root filesystem may not be ideal as performance will not be as good as running a root disk with virtio-block, but it can be useful to run tests and debug while sharing files between host and guest.
You can refer to the advanced usage page for the instructions on how to run virtio-fs as rootfs.
Vsock device
crosvm supports virtio-vsock device for communication between the host and a guest VM.
Assign a context id to a guest VM by passing it with the --vsock flag.
GUEST_CID=3

crosvm run \
  --vsock "${GUEST_CID}" \
  <usual crosvm arguments>
  /path/to/bzImage
Then, the guest and the host can communicate with each other via vsock. Host always has 2 as its context id.
crosvm assumes that the host has a vsock device at /dev/vhost-vsock. If you want to use a device
at a different path or one given as an fd, you can use --vhost-vsock-device flag or
--vhost-vsock-fd flag respectively.
Example usage
This example assumes ncat is installed. If you are using a VM image created using virt-builder,
it needs to come pre-installed with ncat. This can be achieved by running the following command:
    # Build a simple ubuntu image and create a user with no password.
    virt-builder ubuntu-20.04 \
        --run-command "useradd -m -g sudo -p '' $USER ; chage -d 0 $USER" \
        -o ./rootfs \
        --install ncat
At host shell:
PORT=11111

# Listen at host
ncat -l --vsock ${PORT}
At guest shell:
HOST_CID=2
PORT=11111

# Make a connection to the host
ncat --vsock ${HOST_CID} ${PORT}
If a vsock device is configured properly in the guest VM, a connection between the host and the guest can be established and packets can be sent from both side. In the above example, your inputs to a shell on one's side should be shown at the shell on the other side if a connection is successfully established.
Pmem
This section contains the following sub pages:
- VirtIO Pmem describes the basic usage of virtio-pmem device to provide a disk device with the guest.
- Sharing host directory via virtio-pmem describes crosvm's virtual ext2 feature on virtio-pmem, which allow sharing a host directory with the guest as read-only.
VirtIO Pmem
crosvm supports virtio-pmem to provide a virtual device emulating a byte-addressable persistent
memory device. The disk image is provided to the guest using a memory-mapped view of the image file,
and this mapping can be directly mapped into the guest's address space if the guest operating system
and filesystem support DAX.
Pmem devices may be added to crosvm using the --pmem flag, specifying the filename of the backing
image as the parameter. By default, the pmem device will be writable; add ro=true to create a
read-only pmem device instead.
crosvm run \
  --pmem disk.img \
  ... # usual crosvm args
The Linux virtio-pmem driver can be enabled with the CONFIG_VIRTIO_PMEM option. It will expose
pmem devices as /dev/pmem0, /dev/pmem1, etc., which may be mounted like any other block device.
A pmem device may also be used as the root filesystem by adding root=true to the --pmem flag:
crosvm run \
  --pmem rootfs.img,root=true,ro=true \
  ... # usual crosvm args
The advantage of pmem over a regular block device is the potential for less cache duplication; since
the guest can directly map pages of the pmem device, it does not need to perform an extra copy into
the guest page cache. This can result in lower memory overhead versus virtio-block (when not using
O_DIRECT).
The file backing a persistent memory device is mapped directly into the guest's address space, which
means that only the raw disk image format is supported; disk images in qcow2 or other formats may
not be used as a pmem device. See the block device for an alternative that supports
more file formats.
Sharing host directory with virtio-pmem
crosvm has an experimental feature to share a host directory with the guest as read-only via virtio-pmem device.
How it works
When this feature is enabled, crosvm creates a virtual ext2 filesystem in memory. This filesystem
contains the contents of the specified host directory. When creating the file system, crosvm do
mmap each file instead of data copy. As a result, the actual file data is read from disk only when
it's accessed by the guest.
Usage
To share a host directory with the guest, you'll need to start crosvm with the device enabled, and
mount the device in the guest.
Host
You can use --pmem-ext2 flag to enable the device.
$ mkdir host_shared_dir
$ HOST_SHARED_DIR=$(pwd)/host_shared_dir
$ echo "Hello!" > $HOST_SHARED_DIR/test.txt
$ crosvm run \
    --pmem-ext2 "$HOST_SHARED_DIR" \
    # usual crosvm args
You can check a full list of parameters for --pmem-ext2 with crosvm run --help.
Guest
Then, you can mount the ext2 file system from the guest. With -o dax, we can avoid duplicated page
caches between the guest and the host.
$ mkdir /tmp/shared
$ mount -t ext2 -o dax /dev/pmem0 /tmp/shared
$ ls /tmp/shared
lost+found  test.txt
$ cat /tmp/shared/test.txt
Hello!
Comparison with other methods
Since access to files provided by this device is through pmem, it is done as a host OS page fault. This can reduce the number of context switches to the host userspace compared to virtio-blk or virtio-fs.
This feature is similar to the VVFAT (Virtual FAT filesystem) device in QEMU, but our pmem-ext2 uses the ext2 filesystem and supports read-only accesses only.
USB
crosvm supports attaching USB devices from the host by emulating an xhci backend.
Unlike some other VM software like qemu, crosvm does not support attaching USB devices at boot time, however we can tell the VM to attach the devices once the kernel has booted, as long as we started crosvm with a control socket (see the control socket section in advanced usage).
First, start crosvm making sure to specify the control socket:
$ crosvm run -s /run/crosvm.sock ${USUAL_CROSVM_ARGS}
Then, you need to identify which device you want to attach by looking for its USB bus and device number:
$ lsusb
Bus 004 Device 001: ID 1d6b:0003 Linux Foundation 3.0 root hub
Bus 003 Device 001: ID 1d6b:0002 Linux Foundation 2.0 root hub
Bus 002 Device 022: ID 18d1:4ee7 Google Inc. Pixel 5
Bus 002 Device 001: ID 1d6b:0003 Linux Foundation 3.0 root hub
Bus 001 Device 001: ID 1d6b:0002 Linux Foundation 2.0 root hub
Assuming in this example the device you want is the Google Inc. Pixel 5, its bus and port numbers
are 002 and 022 respectively.
There should be a USB device file on the host at the path /dev/bus/usb/002/022 which is what you
want to pass to the crosvm usb attach command:
# crosvm usb attach 00:00:00:00 /dev/bus/usb/002/022 /run/crosvm.sock
You can run this command as root or make sure your current user has permissions to access the device file. Also make sure the device is not currently attached to any other drivers on the host and is not already in use.
NOTE: You need to pass some string formatted like 00:00:00:00 as the first parameter to the
usb attach command. This is a deprecated argument and is not used by crosvm, but we need to
include it anyway for it to work. It will be removed in the future.
On the host you should see a message like:
ok 9
Which tells you the operation succeeded and which port number the USB device is attached to (in this
case 9).
Inside the VM you should see dmesg messages that the USB device has been attached successfully and you should be able to use it as normal.
If you want to detach the device, simply issue a detach command to the same number as the port returned by the attach command:
# crosvm usb detach 9 /run/crosvm.sock
Which should return another ok 9 confirmation.
Keep in mind that when a USB device is attached to a VM, it is in exclusive mode and cannot be used by the host or attached to other VMs.
Wayland
If you have a Wayland compositor running on your host, it is possible to display and control guest applications from it. This requires:
- A guest kernel version 5.16 or above with
CONFIG_DRM_VIRTIO_GPUenabled, - The
sommelierWayland proxy in your guest image.
This section will walk you through the steps needed to get this to work.
Guest kernel requirements
Wayland support on crosvm relies on virtio-gpu contexts, which have been introduced in Linux 5.16.
Make sure your guest kernel is either this version or a more recent one, and that
CONFIG_DRM_VIRTIO_GPU is enabled in your kernel configuration.
Crosvm requirements
Wayland forwarding requires the GPU feature and the virtio-gpu cross domain mode to be enabled.
cargo build --features "gpu"
Building sommelier
Sommelier is a proxy Wayland compositor that forwards the Wayland protocol from a guest to a compositor running on the host through the guest GPU device. As it is not a standard tool, we will have to build it by ourselves. It is recommended to do this from the guest with networking enabled.
Clone ChromeOS' platform2 repository, which contains the source for sommelier:
git clone https://chromium.googlesource.com/chromiumos/platform2
Go into the sommelier directory and prepare for building:
cd platform2/vm_tools/sommelier/
meson setup build -Dwith_tests=false
This setup step will check for all libraries required to build sommelier. If some are missing,
install them using your guest's distro package manager and re-run meson setup until it passes.
Finally, build sommelier and install it:
meson compile -C build
sudo meson install -C build
This last step will put the sommelier binary into /usr/local/bin.
Running guest Wayland apps
Crosvm can connect to a running Wayland server (e.g. weston) on the host and forward the protocol
from all Wayland guest applications to it. To enable this you need to know the socket of the Wayland
server running on your host - typically it would be $XDG_RUNTIME_DIR/wayland-0.
Once you have confirmed the socket, create a GPU device and enable forwarding by adding the
--gpu=context-types=cross-domain --wayland-sock $XDG_RUNTIME_DIR/wayland-0 arguments to your
crosvm command-line. Other context types may be also enabled for those interested in 3D
acceleration.
You can now run Wayland clients through sommelier, e.g:
sommelier --virtgpu-channel weston-terminal
Or
sommelier --virtgpu-channel gedit
Applications started that way should appear on and be controllable from the Wayland server running on your host.
The --virtgpu-channel option is currently necessary for sommelier to work with the setup of this
document, but will likely not be required in the future.
If you have Xwayland installed in the guest you can also run X applications:
sommelier -X --xwayland-path=/usr/bin/Xwayland xeyes
Video (experimental)
The virtio video decoder and encoder devices allow a guest to leverage the host's hardware-accelerated video decoding and encoding capabilities. The specification (v3, v5) for these devices is still a work-in-progress, so testing them requires an out-of-tree kernel driver on the guest.
The virtio-video host device uses backends to perform the actual decoding. The currently supported backends are:
libvda, a hardware-accelerated backend that supports both decoding and encoding by delegating the work to a running instance of Chrome. It can only be built and used in a ChromeOS environment.ffmpeg, a software-based backend that supports encoding and decoding. It exists to make testing and development of virtio-video easier, as it does not require any particular hardware and is based on a reliable codec library.
The rest of this document will solely focus on the ffmpeg backend. More accelerated backends will
be added in the future.
Guest kernel requirements
The virtio_video branch of this kernel git repository contains
a work-in-progress version of the virtio-video guest kernel driver, based on a (hopefully) recent
version of mainline Linux. If you use this as your guest kernel, the virtio_video_defconfig
configuration should allow you to easily boot from crosvm, with the video (and a few other) virtio
devices support built-in.
Quick building guide after checking out this branch:
mkdir build_crosvm_x86
make O=build_crosvm_x86 virtio_video_defconfig
make O=build_crosvm_x86 -j16
The resulting kernel image that can be passed to crosvm will be in
build_crosvm_x86/arch/x86/boot/bzImage.
Crosvm requirements
The virtio-video support is experimental and needs to be opted-in through the "video-decoder" or
"video-encoder" Cargo feature. In the instruction below we'll be using the FFmpeg backend which
requires the "ffmpeg" feature to be enabled as well.
The following example builds crosvm with FFmpeg encoder and decoder backend support:
cargo build --features "video-encoder,video-decoder,ffmpeg"
To enable the decoder device, start crosvm with the --video-decoder=ffmpeg command-line
argument:
crosvm run --disable-sandbox --video-decoder=ffmpeg -c 4 -m 2048 --block /path/to/disk.img,root --serial type=stdout,hardware=virtio-console,console=true,stdin=true /path/to/bzImage
Alternatively, to enable the encoder device, start crosvm with the --video-encoder=ffmpeg
command-line argument:
crosvm run --disable-sandbox --video-encoder=ffmpeg -c 4 -m 2048 --block /path/to/disk.img,root --serial type=stdout,hardware=virtio-console,console=true,stdin=true /path/to/bzImage
If the guest kernel includes the virtio-video driver, then the device should be probed and show up.
Testing the device from the guest
Video capabilities are exposed to the guest using V4L2. The encoder or decoder device should appear
as /dev/videoX, probably /dev/video0 if there are no additional V4L2 devices.
Checking capabilities and formats
v4l2-ctl, part of the v4l-utils package, can be used to test the device's existence.
Example output for the decoder is shown below.
v4l2-ctl -d/dev/video0 --info
Driver Info:
        Driver name      : virtio-video
        Card type        : ffmpeg
        Bus info         : virtio:stateful-decoder
        Driver version   : 5.17.0
        Capabilities     : 0x84204000
                Video Memory-to-Memory Multiplanar
                Streaming
                Extended Pix Format
                Device Capabilities
        Device Caps      : 0x04204000
                Video Memory-to-Memory Multiplanar
                Streaming
                Extended Pix Format
Note that the Card type is ffmpeg, indicating that decoding will be performed in software on the
host. We can then query the support input (OUTPUT in V4L2-speak) formats, i.e. the encoded formats
we can send to the decoder:
v4l2-ctl -d/dev/video0 --list-formats-out
ioctl: VIDIOC_ENUM_FMT
        Type: Video Output Multiplanar

        [0]: 'VP90' (VP9, compressed)
        [1]: 'VP80' (VP8, compressed)
        [2]: 'HEVC' (HEVC, compressed)
        [3]: 'H264' (H.264, compressed)
Similarly, you can check the supported output (or CAPTURE) pixel formats for decoded frames:
v4l2-ctl -d/dev/video0 --list-formats
ioctl: VIDIOC_ENUM_FMT
        Type: Video Capture Multiplanar

        [0]: 'NV12' (Y/CbCr 4:2:0)
Test decoding with ffmpeg
FFmpeg can be used to decode video streams with the virtio-video device.
Simple VP8 stream:
wget https://github.com/chromium/chromium/raw/main/media/test/data/test-25fps.vp8
ffmpeg -codec:v vp8_v4l2m2m -i test-25fps.vp8 test-25fps-%d.png
This should create 250 PNG files each containing a decoded frame from the stream.
WEBM VP9 stream:
wget https://test-videos.co.uk/vids/bigbuckbunny/webm/vp9/720/Big_Buck_Bunny_720_10s_1MB.webm
ffmpeg -codec:v vp9_v4l2m2m -i Big_Buck_Bunny_720_10s_1MB.webm Big_Buck_Bunny-%d.png
Should create 300 PNG files at 720p resolution.
Test decoding with v4l2r
The v4l2r Rust crate also features an example program that can use this driver to decode simple H.264 streams:
git clone https://github.com/Gnurou/v4l2r
cd v4l2r
wget https://github.com/chromium/chromium/raw/main/media/test/data/test-25fps.h264
cargo run --example simple_decoder test-25fps.h264 /dev/video0 --input_format h264 --save test-25fps.nv12
This will decode test-25fps.h264 and write the raw decoded frames in NV12 format into
test-25fps.nv12. You can check the result with e.g. YUView.
Test encoding with ffmpeg
FFmpeg can be used to encode video streams with the virtio-video device.
The following examples generates a test clip through libavfilter and encode it using the virtual H.264, H.265 and VP8 encoder, respectively. (VP9 v4l2m2m support is missing in FFmpeg for some reason.)
# H264
ffmpeg -f lavfi -i smptebars=duration=10:size=640x480:rate=30 \
  -pix_fmt nv12 -c:v h264_v4l2m2m smptebars.h264.mp4
# H265
ffmpeg -f lavfi -i smptebars=duration=10:size=640x480:rate=30 \
  -pix_fmt yuv420p -c:v hevc_v4l2m2m smptebars.h265.mp4
# VP8
ffmpeg -f lavfi -i smptebars=duration=10:size=640x480:rate=30 \
  -pix_fmt yuv420p -c:v vp8_v4l2m2m smptebars.vp8.webm
Virtual U2F Passthrough
crosvm supports sharing a single u2f USB
device between the host and the guest. Unlike with normal USB devices which require to be
exclusively attached to one VM, it is possible to share a single security key between multiple VMs
and the host in a non-exclusive manner using the attach_key command.
A generic hardware security key that supports the fido1/u2f protocol should appear as a
/dev/hidraw interface on the host, like this:
$ lsusb
Bus 004 Device 001: ID 1d6b:0003 Linux Foundation 3.0 root hub
Bus 003 Device 018: ID 1050:0407 Yubico.com YubiKey OTP+FIDO+CCID
Bus 003 Device 001: ID 1d6b:0002 Linux Foundation 2.0 root hub
$ ls /dev/hidraw*
/dev/hidraw0  /dev/hidraw1
In this example, the physical YubiKey presents both a keyboard interface (/dev/hidraw0) and a
u2f-hid interface (/dev/hidraw1). Crosvm supports passing the /dev/hidraw1 interface to the
guest via the crosvm usb attach_key command.
First, start crosvm making sure to specify a control socket:
$ crosvm run -s /run/crosvm.sock ${USUAL_CROSVM_ARGS}
Since the virtual u2f device is surfaced as a generic HID device, make sure your guest kernel is built with support for HID devices. Specifically it needs CONFIG_HID, CONFIG_HIDRAW, CONFIG_HID_GENERIC, and CONFIG_USB_HID enabled.
Once the VM is launched, attach the security key with the following command on the host:
$ crosvm usb attach_key /dev/hidraw1 /run/crosvm.sock
ok 1
The virtual security key will show up inside the guest as a Google USB device with Product and
Vendor IDs as 18d1:f1d0:
$ lsusb
Bus 002 Device 001: ID 1d6b:0003 Linux Foundation 3.0 root hub
Bus 001 Device 002: ID 18d1:f1d0 Google Inc.
Bus 001 Device 001: ID 1d6b:0002 Linux Foundation 2.0 root hub
You can verify that the correct hidraw device has been created in the /dev/ tree:
$ ls /dev/hidraw*
/dev/hidraw0
The device should now be usable as u2f-supported security key both inside the guest and on the host. It can also be attached to other crosvm instances at the same time too.
Vhost-user devices
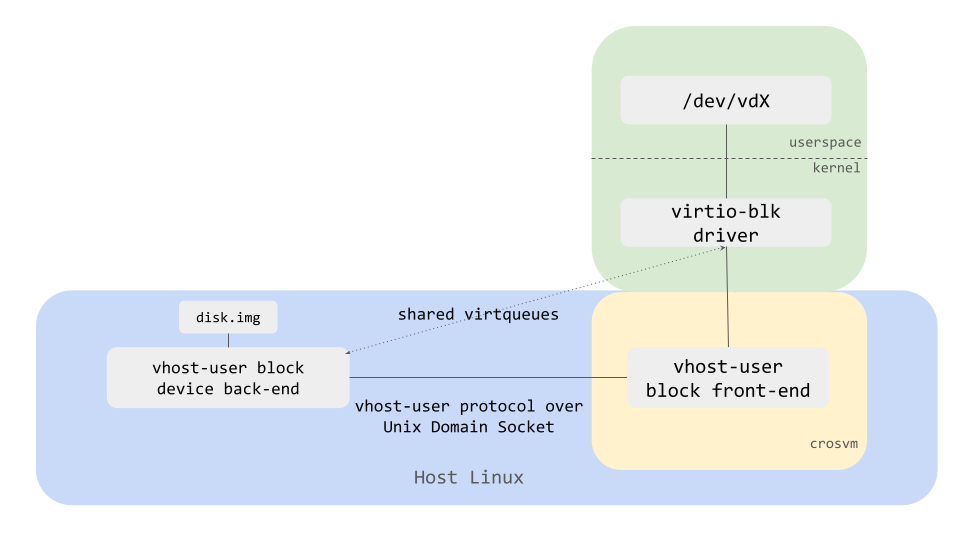
Crosvm supports vhost-user devices for most virtio devices (block, net, etc ) so that device emulation can be done outside of the main vmm process.
Here is a diagram showing how vhost-user block device back-end (implementing the actual disk in userspace) and a vhost-user block front-end (implementing the device facing the guest OS) in crosvm VMM work together.
How to run
Let's take a block device as an example and see how to start vhost-user devices.
First, start vhost-user block backend with crosvm devices command, which waits for a vmm process
connecting to the socket.
# One-time commands to create a disk image.
fallocate -l 1G disk.img
mkfs.ext4 disk.img

VHOST_USER_SOCK=/tmp/vhost-user.socket

# Start vhost-user block backend listening on $VHOST_USER_SOCK
crosvm devices --block vhost=${VHOST_USER_SOCK},path=disk.img
Then, open another terminal and start a vmm process with --vhost-user flag (the frontend).
crosvm run \
  --vhost-user block,socket="${VHOST_USER_SOCK}" \
  <usual crosvm arguments>
  /path/to/bzImage
As a result, disk.img should be exposed as /dev/vda just like with --block disk.img.
Tracing
Crosvm supports tracing to allow developers to debug and diagnose problems and check performance optimizations.
The crate cros_tracing is used as a frontend for trace points across the crosvm codebase. It is
disabled by default but we can enable it with a compile-time flag. It is written to be extensible
and support multiple backends.
The currently supported backends are:
noop: No tracing is enabled. All trace points are compiled out of the application so there is no performance degradation. This is the default backend when no tracing flag is provided.trace_marker: ftrace backend to log trace events to the Linux kernel. Only supported on Linux systems. Enabled by compiling crosvm with the--features trace_markerflag. (On CrOS it is USE flagcrosvm-trace-marker)
cros_tracing Overview
The cros_tracing API consists of the following:
cros_tracing::init(): called at initialization time insrc/main.rsto set up any tracing-specific initialization logic (opening files, set up global state, etc).cros_tracing::push_descriptors!(): a macro that needs to be called every time crosvm sets up a sandbox jail before forking. It adds trace-specific file descriptors to the list of descriptors allowed to be accessed inside the jail, if any.cros_tracing::trace_simple_print!(): a simple macro that behaves like a log() print and sends a simple message to the tracing backend. In case of thetrace_markerbackend, this will show up as a message in the ftrace/print list of events.cros_tracing::trace_event_begin!(): a macro that tracks a tracing context for the given category and emits tracing events. It increased the counter of trace events for that context, if the category is enabled.cros_tracing::trace_event_end!(): the opposite oftrace_event_begin!(). It decreases the counter of currently traced events for that category, if the category is enabled.cros_tracing::trace_event!(): a macro that returns a trace context. It records when it is first executed and the given tag + state. When the returned structure goes out of scope, it is automatically collected and the event is recorded. It is useful to trace entry and exit points in function calls. It is equivalent to callingtrace_event_begin!(), logging data, and then callingtrace_event_end!()before it goes out of scope. It's recommended to usetrace_event!()rather than calltrace_event_begin!()andtrace_event_end!()individually.
The categories that are currently supported by cros_tracing are:
- VirtioFs
- VirtioNet
- USB
- gpu_display
- VirtioBlk
- VirtioScsi
The trace_marker Backend
The trace_marker backend assumes that the host kernel has tracefs enabled and
/sys/kernel/tracing/trace_marker is writable by the host when the crosvm process starts. If the
file cannot be accessed, tracing will not work.
Usage
First, we want to build crosvm with trace_marker enabled:
cargo build --features trace_marker
To verify that tracing is working, first start a trace capture on the host. You can use something like trace-cmd or manually enable tracing in the system from the terminal:
sudo echo 1 > /sys/kernel/tracing/tracing_on
We can check that virtiofs tracing is working by launching crosvm with a virtiofs filesystem:
sudo crosvm run --disable-sandbox --shared-dir ${MOUNTPOINT}:mtdroot:type=fs -p "rootfstype=virtiofs root=mtdroot rw init=/bin/bash" ${KERNEL}
Where ${MOUNTPOINT} is your virtiofs filesystem and ${KERNEL} is your linux kernel.
In another terminal, open a cat stream on the /sys/kernel/tracing/trace_pipe file to view the
tracing events in real time:
sudo cat /sys/kernel/tracing/trace_pipe
As you issue virtiofs requests, you should see events showing up like:
<...>-3802142 [011] ..... 2179601.746212: tracing_mark_write: fuse server: handle_message: in_header=InHeader { len: 64, opcode: 18, unique: 814, nodeid: 42, uid: 0, gid: 0, pid: 0, padding: 0 }
<...>-3802142 [011] ..... 2179601.746226: tracing_mark_write: 503 VirtioFs Enter: release - (self.tag: "mtdroot")(inode: 42)(handle: 35)
<...>-3802142 [011] ..... 2179601.746244: tracing_mark_write: 503 VirtioFs Exit: release
Adding Trace Points
You can add you own trace points by changing the code and recompiling.
If you just need to add a simple one-off trace point, you can use trace_simple_print!() like this
(taken from devices/src/virtio/fs/worker.rs):
#![allow(unused)]
fn main() {
pub fn process_fs_queue<F: FileSystem + Sync>(
    mem: &GuestMemory,
    interrupt: &Interrupt,
    queue: &mut Queue,
    server: &Arc<fuse::Server<F>>,
    tube: &Arc<Mutex<Tube>>,
    slot: u32,
) -> Result<()> {
    // Added simple print here
    cros_tracing::trace_simple_print!("Hello world.");
    let mapper = Mapper::new(Arc::clone(tube), slot);
    while let Some(avail_desc) = queue.pop(mem) {
        let reader =
            Reader::new(mem.clone(), avail_desc.clone()).map_err(Error::InvalidDescriptorChain)?;
        let writer =
            Writer::new(mem.clone(), avail_desc.clone()).map_err(Error::InvalidDescriptorChain)?;

        let total = server.handle_message(reader, writer, &mapper)?;

        queue.add_used(mem, avail_desc.index, total as u32);
        queue.trigger_interrupt();
    }
}
Recompile and you will see your message show up like:
<...>-3803691 [006] ..... 2180094.296405: tracing_mark_write: Hello world.
So far so good, but to get the most out of it you might want to record how long the function takes
to run and some extra parameters. In that case you want to use trace_event!() instead:
#![allow(unused)]
fn main() {
pub fn process_fs_queue<F: FileSystem + Sync>(
    mem: &GuestMemory,
    interrupt: &Interrupt,
    queue: &mut Queue,
    server: &Arc<fuse::Server<F>>,
    tube: &Arc<Mutex<Tube>>,
    slot: u32,
) -> Result<()> {
    // Added trace event with slot
    let _trace = cros_tracing::trace_event!(VirtioFs, "process_fs_queue", slot);
    let mapper = Mapper::new(Arc::clone(tube), slot);
    while let Some(avail_desc) = queue.pop(mem) {
        let reader =
            Reader::new(mem.clone(), avail_desc.clone()).map_err(Error::InvalidDescriptorChain)?;
        let writer =
            Writer::new(mem.clone(), avail_desc.clone()).map_err(Error::InvalidDescriptorChain)?;

        let total = server.handle_message(reader, writer, &mapper)?;

        queue.add_used(mem, avail_desc.index, total as u32);
        queue.trigger_interrupt();
    }
}
Recompile and this will show up:
<...>-3805264 [017] ..... 2180567.774540: tracing_mark_write: 512 VirtioFs Enter: process_fs_queue - (slot: 0)
<...>-3805264 [017] ..... 2180567.774551: tracing_mark_write: 512 VirtioFs Exit: process_fs_queue
The number 512 in the log corresponds to a unique identifier for that event so it's easier to
trace which Enter corresponds to which Exit. Note how the value of slot also has been
recorded. To be able to output the state, the data type needs to support the fmt::Debug trait.
NOTE: The unique identifier for each event is unique only per-process. If the crosvm process forks (like spawning new devices) then it is possible for two events from different processes to have the same ID, in which case it's important to look at the recorded PID that emitted each event in the trace.
The numbers like 2180567.774540 and 2180567.774551 in the example above are the timestamps for
that event, in <sec>.<usec> format. We can see that the process_fs_queue call took 11usec to
execute.
In this last example we used the VirtioFs category tag. If you want to add a new category tag to
trace_marker, it can be done by adding it to the the setup_trace_marker!() call in
cros_tracing/src/trace_marker.rs:
#![allow(unused)]
fn main() {
// List of categories that can be enabled.
setup_trace_marker!(
    (VirtioFs, true),
    (VirtioNet, true),
    (USB, true),
    (gpu_display, true),
    (VirtioBlk, true),
    (VirtioScsi, true),
    (NewCategory, true)
);
}
If the value is false then the events will not be traced. This can be useful when you just want to
trace a specific category and don't care about the rest, you can disable them in the code and
recompile crosvm.
NOTE: Trace events are compile-time to reduce runtime overhead in non-tracing builds so a lot of changes require recompiling and re-deploying crosvm.
Crosvm System Integration
The following sections describe how crosvm is integrated into other projects.
Crosvm on ChromeOS
A copy of crosvm is included in the ChromeOS source tree at chromiumos/platform/crosvm, which is referred to as downstream crosvm.
All crosvm development is happening upstream at crosvm/crosvm. Changes from upstream crosvm are regularly merged with ChromeOS's downstream crosvm.
The merge process.
A crosvm bot will regularly generate automated commits that merge upstream crosvm into downstream. These commits can be found in gerrit.
The crosvm team is submitting these merges through the ChromeOS CQ regularly, which happens roughly once per week, but time can vary depending on CQ health.
Googlers can find more information on the merge process at go/crosvm-uprev-playbook.
Building crosvm for ChromeOS
crosvm on ChromeOS is usually built with Portage, so it follows the same general workflow as any
cros_workon package. The full package name is chromeos-base/crosvm.
The developer guide section on Make your Changes applies to crosvm as well. You can specify the development version to be built with cros_workon, and build with cros build-packages. Consecutive builds without changes to dependency can be done with emerge.
(chroot)$ cros_workon --board=${BOARD} start chromeos-base/crosvm
(chroot or host)$ cros build-packages --board=${BOARD} chromeos-base/crosvm
(chroot)$ emerge-${BOARD} chromeos-base/crosvm -j 10
Deploy it via cros deploy:
(chroot)$ cros deploy ${IP} crosvm
Iterative test runs can be done as well:
(chroot)$ FEATURES=test emerge-${BOARD} chromeos-base/crosvm -j 10
Warning: Using cros_workon_make is possible but patches the local Cargo.toml file and some
configuration files. Please do not submit these changes. Also something makes it rebuild a lot of
the files.
Rebuilding all crosvm dependencies
Crosvm has a lot of rust dependencies that are installed into a registry inside cros_sdk. After a
repo sync these can be out of date, causing compilation issues. To make sure all dependencies are
up to date, run:
(chroot or host)$ cros build-packages --board=${BOARD} chromeos-base/crosvm
Building crosvm for Linux
emerge and cros_workon_make workflows can be quite slow to work with, hence a lot of developers
prefer to use standard cargo workflows used upstream.
Just make sure to initialize git submodules (git submodules update --init), which is not done by
repo. After that, you can use the workflows as outlined in
Building Crosvm outside of cros_sdk.
Note: You can not build or test ChromeOS specific features this way.
Submitting Changes
All changes to crosvm are made upstream, using the same process outlined in Contributing. It is recommended to use the Building crosvm for Linux setup above to run upstream presubmit checks / formatting tools / etc when submitting changes.
Code submitted upstream is tested on linux, but not on ChromeOS devices. Changes will only be tested on the ChromeOS CQ when they go through the merge process.
Has my change landed in ChromeOS (Googlers only)?
You can use the crosland tool to check in which ChromeOS version your changes have been merged into the chromiumos/platform/crosvm repository.
The merge will also contain all BUG= references that will notify your bugs about when the change
is submitted.
For more details on the process, please see go/crosvm-uprev-playbook (Googlers only).
Cq-Depend
We cannot support Cq-Depend to sychronize changes with other ChromeOS repositories. Please try to make changes in a backwards compatible way to allow them to be submitted independently.
If it cannot be avoided at all, please follow this process:
- Upload your change to upstream crosvm and get it reviewed. Do not submit it yet.
- Upload the change to chromiumos/platform/crosvm as well.
- Use Cq-Depend on the ChromeOS changes and submit it via the CQ.
- After the changes landed in ChromeOS, land them upstream as well.
rutabaga chromeos releases
Upstream crosvm and ChromeOS crosvm will use different versions of rutabaga_gfx crate to guarantee ChromeOS crosvm stability.
The versions will be API-compatible. This creates two possible scenarios that downstream integrators should be prepared for.
upstream rutabaga_gfx update from U.V.W to version X.Y.Z and updating version in ChromeOS downstream
This most commonly happens when upstream crosvm starts using new rutabaga_gfx APIs.
In this case, upstream crosvm will use rutabaga_gfx-X.Y.Z, while downstream will use rutabaga_gfx-X.Y.Z-chromeos.
The downstream integrator would need to:
- Uprev to rutabaga-X.Y.Z in upstream crosvm. This will cause a merge conflict for downstream.
- Perform a downstream merge. As part of the merge conflict resolution, change rutabaga-U.V.W-chromeos to rutabaga_gfx-X.Y.Z-chromeos. Make another change to CrOS Rust registry to use rutabaga-X.Y.Z-chromeos. Use the Cq-Depend mechanism so both the merge commit and CrOS Rust registry change go in at the same time.
It is recommended for the upstream update to occur even without downstream CQ testing for ChromeOS. The reason is rutabaga_gfx-X.Y.Z-chromeos is functionally frozen on a known good version, with just enough stub API additions to maintain compatibility. The likelihood of breakage under this model is very small.
upstream rutabaga_gfx update from U.V.W to version X.Y.Z while keeping the old version in ChromeOS downstream
This most commonly happens when upstream crosvm starts using a new rutabaga_gfx version for bug-fixes or features, but those bug-fixes/features don't require new APIs.
In this case, a rutabaga_gfx-X.Y-Z-chromeos release will not be available on crates.io.
The downstream integrator would need to:
- Uprev to rutabaga-X.Y.Z in upstream crosvm. This will cause a merge conflict for downstream.
- Perform a downstream merge. As part of the merge conflict resolution, keep rutabaga-U.V.W-chromeos as the desired version (since it is API compatible with rutabaga_gfx-X.Y.Z).
Cherry-picking
Cherry-picking without the usual merge process
If you need your changes faster than the usual merge frequency, please follow this process:
- Upload and submit your change to upstream crosvm.
- Upload the change to chromiumos/platform/crosvm as well.
- Submit as usual through the CQ.
Never submit code just to ChromeOS, as it will cause upstream to diverge and result in merge conflicts down the road.
Cherry-picking to release branch
Your change need to be merged into chromiumos/platform/crosvm to cherry-pick it to a release branch. You should follow ChromiumOS Merge Workflow to cherry-pick your changes. Since changes are merged from crosvm/crosvm to chromiumos/platform/crosvm through the merge process, you can't use gerrit to cherry-pick your changes but need to use git command locally.
$ cd chromiumos/src/platform/crosvm
$ git branch -a | grep remotes/cros/release-R120
  remotes/cros/release-R120-15662.B
$ git checkout -b my-cherry-pick cros/release-R120-15662.B
$ git cherry-pick -x $COMMIT
$ git push cros HEAD:refs/for/release-R120-15662.B
$COMMIT is the commit hash of the original change you want to cherry-pick not the merge commit.
Note that you push to special gerrit refs/for/, not pushing directly to the release branch.
Also note that release branch cherry picks don't get CQ tested at all - they are submitted directly once you CQ+2 - so it is very important to test locally first.
Running a Tryjob
For googlers, see go/cdg-site
Architecture
This chapter explains the internal architecture of CrosVM for contributors.
- Overview - broad overview of CrosVM
- Interrupts - deep dive into interrupts
Architecture
The principle characteristics of crosvm are:
- A process per virtual device, made using fork on Linux
- Each process is sandboxed using minijail
- Support for several CPU architectures, operating systems, and hypervisors
- Written in Rust for security and safety
A typical session of crosvm starts in main.rs where command line parsing is done to build up a
Config structure. The Config is used by run_config in src/crosvm/sys/unix.rs to setup and
execute a VM. Broken down into rough steps:
- Load the Linux kernel from an ELF or bzImage file.
- Create a handful of control sockets used by the virtual devices.
- Invoke the architecture-specific VM builder
Arch::build_vm(located inx86_64/src/lib.rs,aarch64/src/lib.rs, orriscv64/src/lib.rs). Arch::build_vmwill create aRunnableLinuxVmto represent a virtual machine instance.create_devicescreates every PCI device, including the virtio devices, that were configured inConfig, along with matching minijail configs for each.Arch::assign_pci_addressesassigns an address to each PCI device, prioritizing devices that report a preferred slot by implementing thePciDevicetrait'spreferred_addressfunction.Arch::generate_pci_root, using a list of every PCI device with optionalMinijail, will finally jail the PCI devices and construct aPciRootthat communicates with them.- Once the VM has been built, it's contained within a
RunnableLinuxVmobject that is used by the VCPUs and control loop to service requests until shutdown.
Forking
During the device creation routine, each device will be created and then wrapped in a ProxyDevice
which will internally fork (but not exec) and minijail the device, while dropping it for the
main process. The only interaction that the device is capable of having with the main process is via
the proxied trait methods of BusDevice, shared memory mappings such as the guest memory, and file
descriptors that were specifically allowed by that device's security policy. This can lead to some
surprising behavior to be aware of such as why some file descriptors which were once valid are now
invalid.
Sandboxing Policy
Every sandbox is made with minijail and starts with create_sandbox_minijail in jail crate
which set some very restrictive settings. Linux namespaces and seccomp filters are used for
sandboxing. Each seccomp policy can be found under jail/seccomp/{arch}/{device}.policy and should
start by @include-ing the common_device.policy. With the exception of architecture specific
devices (such as Pl030 on ARM or I8042 on x86_64), every device will need a different policy for
each supported architecture.
The VM Control Sockets
For the operations that devices need to perform on the global VM state, such as mapping into guest memory address space, there are the VM control sockets. There are a few kinds, split by the type of request and response that the socket will process. This also proves basic security privilege separation in case a device becomes compromised by a malicious guest. For example, a rogue device that is able to allocate MSI routes would not be able to use the same socket to (de)register guest memory. During the device initialization stage, each device that requires some aspect of VM control will have a constructor that requires the corresponding control socket. The control socket will get preserved when the device is sandboxed and the other side of the socket will be waited on in the main process's control loop.
The socket exposed by crosvm with the --socket command line argument is another form of the VM
control socket. Because the protocol of the control socket is internal and unstable, the only
supported way of using that resulting named unix domain socket is via crosvm command line
subcommands such as crosvm stop or programmatically via the crosvm_control library.
GuestMemory
GuestMemory and its friends VolatileMemory, VolatileSlice, MemoryMapping, and
SharedMemory, are common types used throughout crosvm to interact with guest memory. Know which
one to use in what place using some guidelines
GuestMemoryis for sending around references to all of the guest memory. It can be cloned freely, but the underlying guest memory is always the same. Internally, it's implemented usingMemoryMappingandSharedMemory. Note thatGuestMemoryis mapped into the host address space (for non-protected VMs), but it is non-contiguous. Device memory, such as mapped DMA-Bufs, are not present inGuestMemory.SharedMemorywraps amemfdand can be mapped usingMemoryMappingto access its data.SharedMemorycan't be cloned.VolatileMemoryis a trait that exposes generic access to non-contiguous memory.GuestMemoryimplements this trait. Use this trait for functions that operate on a memory space but don't necessarily need it to be guest memory.VolatileSliceis analogous to a Rust slice, but unlike those, aVolatileSlicehas data that changes asynchronously by all those that reference it. Exclusive mutability and data synchronization are not available when it comes to aVolatileSlice. This type is useful for functions that operate on contiguous shared memory, such as a single entry from a scatter gather table, or for safe wrappers around functions which operate on pointers, such as areadorwritesyscall.MemoryMappingis a safe wrapper around anonymous and file mappings. Provides RAII and does munmap after use. Access via Rust references is forbidden, but indirect reading and writing is available viaVolatileSliceand several convenience functions. This type is most useful for mapping memory unrelated toGuestMemory.
See memory layout for details how crosvm arranges the guest address space.
Device Model
Bus/BusDevice
The root of the crosvm device model is the Bus structure and its friend the BusDevice trait. The
Bus structure is a virtual computer bus used to emulate the memory-mapped I/O bus and also I/O
ports for x86 VMs. On a read or write to an address on a VM's bus, the corresponding Bus object is
queried for a BusDevice that occupies that address. Bus will then forward the read/write to the
BusDevice. Because of this behavior, only one BusDevice may exist at any given address. However,
a BusDevice may be placed at more than one address range. Depending on how a BusDevice was
inserted into the Bus, the forwarded read/write will be relative to 0 or to the start of the
address range that the BusDevice occupies (which would be ambiguous if the BusDevice occupied
more than one range).
Only the base address of a multi-byte read/write is used to search for a device, so a device
implementation should be aware that the last address of a single read/write may be outside its
address range. For example, if a BusDevice was inserted at base address 0x1000 with a length of
0x40, a 4-byte read by a VCPU at 0x39 would be forwarded to that BusDevice.
Each BusDevice is reference counted and wrapped in a mutex, so implementations of BusDevice need
not worry about synchronizing their access across multiple VCPUs and threads. Each VCPU will get a
complete copy of the Bus, so there is no contention for querying the Bus about an address. Once
the BusDevice is found, the Bus will acquire an exclusive lock to the device and forward the
VCPU's read/write. The implementation of the BusDevice will block execution of the VCPU that
invoked it, as well as any other VCPU attempting access, until it returns from its method.
Most devices in crosvm do not implement BusDevice directly, but some are examples are i8042 and
Serial. With the exception of PCI devices, all devices are inserted by architecture specific code
(which may call into the architecture-neutral arch crate). A BusDevice can be proxied to a
sandboxed process using ProxyDevice, which will create the second process using a fork, with no
exec.
PciConfigIo/PciConfigMmio
In order to use the more complex PCI bus, there are a couple adapters that implement BusDevice and
call into a PciRoot with higher level calls to config_space_read/config_space_write. The
PciConfigMmio is a BusDevice for insertion into the MMIO Bus for ARM devices. For x86_64,
PciConfigIo is inserted into the I/O port Bus. There is only one implementation of PciRoot
that is used by either of the PciConfig* structures. Because these devices are very simple, they
have very little code or state. They aren't sandboxed and are run as part of the main process.
PciRoot/PciDevice/VirtioPciDevice
The PciRoot, analogous to BusDevice for Buss, contains all the PciDevice trait objects.
Because of a shortcut (or hack), the ProxyDevice only supports jailing BusDevice traits.
Therefore, PciRoot only contains BusDevices, even though they also implement PciDevice. In
fact, every PciDevice also implements BusDevice because of a blanket implementation
(impl<T: PciDevice> BusDevice for T { … }). There are a few PCI related methods in BusDevice to
allow the PciRoot to still communicate with the underlying PciDevice (yes, this abstraction is
very leaky). Most devices will not implement PciDevice directly, instead using the
VirtioPciDevice implementation for virtio devices, but the xHCI (USB) controller is an example
that implements PciDevice directly. The VirtioPciDevice is an implementation of PciDevice that
wraps a VirtioDevice, which is how the virtio specified PCI transport is adapted to a transport
agnostic VirtioDevice implementation.
VirtioDevice
The VirtioDevice is the most widely implemented trait among the device traits. Each of the
different virtio devices (block, rng, net, etc.) implement this trait directly and they follow a
similar pattern. Most of the trait methods are easily filled in with basic information about the
specific device, but activate will be the heart of the implementation. It's called by the virtio
transport after the guest's driver has indicated the device has been configured and is ready to run.
The virtio device implementation will receive the run time related resources (GuestMemory,
Interrupt, etc.) for processing virtio queues and associated interrupts via the arguments to
activate, but activate can't spend its time actually processing the queues. A VCPU will be
blocked as long as activate is running. Every device uses activate to launch a worker thread
that takes ownership of run time resources to do the actual processing. There is some subtlety in
dealing with virtio queues, so the smart thing to do is copy a simpler device and adapt it, such as
the rng device (rng.rs).
Communication Framework
Because of the multi-process nature of crosvm, communication is done over several IPC primitives.
The common ones are shared memory pages, unix sockets, anonymous pipes, and various other file
descriptor variants (DMA-buf, eventfd, etc.). Standard methods (read/write) of using these
primitives may be used, but crosvm has developed some helpers which should be used where applicable.
WaitContext
Most threads in crosvm will have a wait loop using a WaitContext, which is a wrapper around a
epoll on Linux and WaitForMultipleObjects on Windows. In either case, waitable objects can be
added to the context along with an associated token, whose type is the type parameter of
WaitContext. A call to the wait function will block until at least one of the waitable objects
has become signaled and will return a collection of the tokens associated with those objects. The
tokens used with WaitContext must be convertible to and from a u64. There is a custom derive
#[derive(EventToken)] which can be applied to an enum declaration that makes it easy to use your
own enum in a WaitContext.
Linux Platform Limitations
The limitations of WaitContext on Linux are the same as the limitations of epoll. The same FD
can not be inserted more than once, and the FD will be automatically removed if the process runs out
of references to that FD. A dup/fork call will increment that reference count, so closing the
original FD will not actually remove it from the WaitContext. It is possible to receive tokens
from WaitContext for an FD that was closed because of a race condition in which an event was
registered in the background before the close happened. Best practice is to keep an FD open and
remove it from the WaitContext before closing it so that events associated with it can be reliably
eliminated.
serde with Descriptors
Using raw sockets and pipes to communicate is very inconvenient for rich data types. To help make
this easier and less error prone, crosvm uses the serde crate. To allow transmitting types with
embedded descriptors (FDs on Linux or HANDLEs on Windows), a module is provided for sending and
receiving descriptors alongside the plain old bytes that serde consumes.
Code Map
Source code is organized into crates, each with their own unit tests.
./src/- The top-level binary front-end for using crosvm.aarch64- Support code specific to 64-bit ARM architectures.base- Safe wrappers for system facilities which provides cross-platform-compatible interfaces.cros_async- Runtime for async/await programming. This crate provides aFutureexecutor based onio_uringand one based onepoll.devices- Virtual devices exposed to the guest OS.disk- Library to create and manipulate several types of disks such as raw disk, qcow, etc.hypervisor- Abstract layer to interact with hypervisors. For Linux, this crate is a wrapper ofkvm.e2e_tests- End-to-end tests that run a crosvm VM.infra- Infrastructure recipes for continuous integration testing.jail- Sandboxing helper library for Linux.jail/seccomp- Contains minijail seccomp policy files for each sandboxed device. Because some syscalls vary by architecture, the seccomp policies are split by architecture.kernel_loader- Loads kernel images in various formats to a slice of memory.kvm_sys- Low-level (mostly) auto-generated structures and constants for using KVM.kvm- Unsafe, low-level wrapper code for usingkvm_sys.media/libvda- Safe wrapper of libvda, a ChromeOS HW-accelerated video decoding/encoding library.net_sys- Low-level (mostly) auto-generated structures and constants for creating TUN/TAP devices.net_util- Wrapper for creating TUN/TAP devices.qcow_util- A library and a binary to manipulate qcow disks.sync- Our version ofstd::sync::Mutexandstd::sync::Condvar.third_party- Third-party libraries which we are maintaining on the ChromeOS tree or the AOSP tree.tools- Scripts for code health such as wrappers ofrustfmtandclippy.vfio_sys- Low-level (mostly) auto-generated structures, constants and ioctls for VFIO.vhost- Wrappers for creating vhost based devices.virtio_sys- Low-level (mostly) auto-generated structures and constants for interfacing with kernel vhost support.vm_control- IPC for the VM.vm_memory- VM-specific memory objects.x86_64- Support code specific to 64-bit x86 machines.
Interrupts (x86_64)
Interrupts are how devices request service from the guest drivers. This page explores the details of interrupt routing from the perspective of CrosVM.
Critical acronyms
This subject area uses a lot of acronyms:
- IRQ: Interrupt ReQuest
- ISR: Interrupt Service Routine
- EOI: End Of Interrupt
- MSI: message signaled interrupts. In this document, synonymous with MSI-X.
- MSI-X: message signaled interrupts - extended
- LAPIC: local APIC
- APIC: Advanced Programmable Interrupt Controller (successor to the legacy PIC)
- IOAPIC: IO APIC (has physical interrupt lines, which it responds to by triggering an MSI directed to the LAPIC).
- PIC: Programmable Interrupt Controller (the "legacy PIC" / Intel 8259 chip).
Interrupts come in two flavors
Interrupts on x86_64 in CrosVM come in two primary flavors: legacy and MSI-X. In this document,
MSI is used to refer to the concept of message signaled interrupts, but it always refers to
interrupts sent via MSI-X because that is what CrosVM uses.
Legacy interrupts (INTx)
These interrupts are traditionally delivered via dedicated signal lines to PICs and/or the IOAPIC. Older devices, especially those that are used during early boot, often rely on these types of interrupts. These typically are the first 24 GSIs, and are serviced either by the PIC (during very early boot), or by the IOAPIC (after it is activated & the PIC is switched off).
Background on EOI
The purpose of EOI is rooted in how legacy interrupt lines are shared. If two devices D1 and D2
share a line L, D2 has no guarantee that it will be serviced when L is asserted. After
receiving EOI, D2 has to check whether it was serviced, and if it was not, to re-assert L. An
example of how this occurs is if D2 requests service while D1 is already being serviced. In that
case, the line has to be reasserted otherwise D2 won't be serviced.
Because interrupt lines to the IOAPIC can be shared by multiple devices, EOI is critical for devices to figure out whether they were serviced in response to sending the IRQ, or whether the IRQ needs to be resent. The operating principles mean that sending extra EOIs to a legacy device is perfectly safe, because they could be due to another device on the same line receiving service, and so devices must be tolerant of such "extra" (from their perspective) EOIs.
These "extra" EOIs come from the fact that EOI is often a broadcast message that goes to all legacy devices. Broadcast is required because interrupt lines can be routed through the two 8259 PICs via cascade before they reach the CPU, broadcast to both PICs (and attached devices) is the only way to ensure EOI reaches the device that was serviced.
EOI in CrosVM
When the guest's ISR completes and signals EOI, the CrosVM irqchip implementation is responsible for propagating EOI to the device backends. EOI is delivered to the devices via their resample event. Devices are then responsible for listening to that resample event, and checking their internal state to see if they received service. If the device wasn't serviced, it must then reassert the IRQ.
MSIs
MSIs do not use dedicated signal lines; instead, they are "messages" which are sent on the system bus. The LAPIC(s) receive these messages, and inject the interrupt into the VCPU (where injection means: jump to ISR).
About EOI
EOI is not meaningful for MSIs because lines are never shared. No devices using MSI will listen for the EOI event, and the irqchip will not signal it.
The fundamental deception on x86_64: there are no legacy interrupts (usually)
After very early boot, the PIC is switched off and legacy interrupts somewhat cease to be legacy. Instead of being handled by the PIC, legacy interrupts are handled by the IOAPIC, and all the IOAPIC does is convert them into MSIs; in other words, from the perspective of CrosVM & the guest VCPUs, after early boot, every interrupt is a MSI.
Interrupt handling irqchip specifics
Each IrqChip can handle interrupts differently. Often these differences are because the underlying
hypervisors will have different interrupt features such as KVM's irqfds. Generally a hypervisor has
three choices for implementing an irqchip:
- Fully in kernel: all of the irqchip (LAPIC & IOAPIC) are implemented in the kernel portion of the hypervisor.
- Split: the performance critical part of the irqchip (LAPIC) is implemented in the kernel, but the IOAPIC is implemented by the VMM.
- Userspace: here, the entire irqchip is implemented in the VMM. This is generally slower and not commonly used.
Below, we describe the rough flow for interrupts in virtio devices for each of the chip types. We limit ourselves to virtio devices becauseas these are the performance critical devices in CrosVM.
Kernel mode IRQ chip (w/ irqfd support)
MSIs
- Device wants service, so it signals an
Eventobject. - The
Eventobject is registered with the hypervisor, so the hypervisor immediately routes the IRQ to a LAPIC so a VCPU can be interrupted. - The LAPIC interrupts the VCPU, which jumps to the kernel's ISR (interrupt service routine).
- The ISR runs.
Legacy interrupts
These are handled similarly to MSIs, except the kernel mode IOAPIC is what initially picks up the event, rather than the LAPIC.
Split IRQ chip (w/ irqfd support)
This is the same as the kernel mode case.
Split IRQ chip (no irqfd kernel support)
MSIs
- Device wants service, so it signals an
Eventobject. - The
Eventobject is attached to the IrqChip in CrosVM. An interrupt handling thread wakes up from theEventsignal. - The IrqChip resets the
Event. - The IrqChip asserts the interrupt to the LAPIC in the kernel via an ioctl (or equivalent).
- The LAPIC interrupts the VCPU, which jumps to the kernel’s ISR (interrupt service routine).
- The ISR runs, and on completion sends EOI (end of interrupt). In CrosVM, this is called the resample event.
- EOI is sent.
Legacy interrupts
This introduces an additional Event object in the interrupt path, since the IRQ pin itself is an
Event, and the MSI is also an Event. These interrupts are processed twice by the IRQ handler:
once as a legacy IOAPIC event, and a second time as an MSI.
Userspace IRQ chip
This chip is not widely used in production. Contributions to fill in this section are welcome.
Architecture: Snapshotting
Snapshotting is a highly experimental feature currently under development. It is 100% not supported and only supports a very limited set of devices. This page roughly summarizes how the system works, and how device authors should think about it when writing new devices.
The snapshot & restore sequence
The data required for a snapshot is stored in several places, including guest memory, and the devices running on the host. To take an accurate snapshot, we need a point in time snapshot. Since there is no way to fetch this state atomically, we have to freeze the guest (VCPUs) and the device backends. Similarly, on restore we must freeze in the same way to prevent partially restored state from being modified.
Snapshot format
The snapshot format is not stable. Currently, the output is a directory, where most VM components are snapshotted to separate files using CBOR encoding.
When debugging snapshots, you may want to inspect the CBOR files. One tool available is
cbor-cli. You can run cargo install cbor-cli, then use it
to view a file as JSON, e.g.
$ cbor export --format=json /tmp/crosvm-snapshot/irqchip | jq
{
  "mp_state": [
    "Halted",
    "Halted",
    "Halted",
    "Halted"
  ],
  "pit_state": {
...
Snapshotting a running VM
In code, this is implemented by vm_control::do_snapshot. We always freeze the VCPUs first (vm_control::VcpuSuspendGuard). This is done so that we can flush all pending interrupts to the irqchip (LAPIC) without triggering further activity from the driver (which could in turn trigger more device activity). With the VCPUs frozen, we freeze devices (vm_control::DeviceSleepGuard). From here, it's a just a matter of serializing VCPU state, guest memory, and device state.
A word about interrupts
Interrupts come in two primary flavors from the snapshotting perspective: legacy interrupts (e.g. IOAPIC interrupt lines), and MSIs.
Legacy interrupts
These are a little tricky because they are allocated as part of device creation, and device creation
happens before we snapshot or restore. To avoid actually having to snapshot or restore the
Event object wiring for these interrupts, we rely on the fact that as long as the VM is created
with the right shape (e.g. devices), the interrupt Events will be wired between the device & the
irqchip correctly. As part of restoring, we will set the routing table, which ensures that those
events map to the right GSIs in the hypervisor.
MSIs
These are much simpler, because of how MSIs are implemented in CrosVM. In MsixConfig, we save the
MSI routing information for every IRQ. At restore time, we just register these MSIs with the
hypervisor using the exact same mechanism that would be invoked on device activation (albeit
bypassing GSI allocation since we know from the saved state exactly which GSI must be used).
Flushing IRQs to the irqchip
IRQs sometimes pass through multiple host Events before reaching the hypervisor (or VCPU loop) for
injection. Rather than trying to snapshot the Event state, we freeze all interrupt sources
(devices) and flush all pending interrupts into the irqchip. This way, snapshotting the irqchip
state is sufficient to capture all pending interrupts.
Two-step snapshotting
Two-step snapshotting is performed in crosvm to ensure data retention.
Problem definition:
- VMM Manager requests crosvm to suspend.
- Crosvm suspends, however host-side processes are still running.
- VMM Manager requests processes suspend.
- VMM Manager requests snapshot from crosvm.
- VMM Manager snapshots host-side processes.
- VMM Manager requests host-side processes and crosvm to resume (or stop).
The problem is that data may be lost in steps 4 & 5, because of the time between steps 2 & 3. After step 2, crosvm is suspended and host-side processes are still running, which means host-side processes may send data to crosvm but the device in crosvm has not read that data.
When the VM resumes, there are no issues, as the data gets read and processing continues normally. However, when the VM restores, that data is lost as it was not saved.
Solution is two-step snapshotting. We modify step 4 to read any data coming from the host just before snapshotting, to save that data in crosvm, and then process that data when the VM resumes.
Restoring a VM in lieu of booting
Restoring on to a running VM is not supported, and may never be. Our preferred approach is to
instead create a new VM from a snapshot. This is why vm_control::do_restore can be invoked as part
of the VM creation process.
Implications for device authors
New devices SHOULD be compatible with the devices::Suspendable trait, but MAY defer actual
implementation to the future. This trait's implementation defines how the device will sleep/wake,
and how its state will be saved & restored as part of snapshotting.
New virtio devices SHOULD implement the virtio device snapshot methods on
VirtioDevice:
virtio_sleep, virtio_wake, virtio_snapshot, and virtio_restore.
Hypervisor Support
Multiple hypervisor backends are supported. See Advanced Usage for overriding the default backend.
Hypervisors added to crosvm must meet the following requirements:
- Hypervisor code must be buildable in crosvm upstream.
- Within reason, crosvm maintainers will ensure the hypervisor's code continues to build.
- Hypervisors are not required to be tested upstream.
- We can't require testing upstream because some hypervisors require specialized hardware.
- When not tested upstream, the hypervisor's maintainers are expected to test it downstream. If a change to crosvm breaks something downstream, then the hypervisor's maintainers are expected to supply the fix and can't expect a revert of the culprit change to be accepted upstream.
KVM
- Platforms: Linux
- Tested upstream: yes
KVM is crosvm's preferred hypervisor for Linux.
WHPX
- Platforms: Windows
- Tested upstream: no
- Contacts: vnagarnaik@google.com
HAXM
- Platforms: Windows
- Tested upstream: no
- Contacts: vnagarnaik@google.com
Android Specific
The hypervisors in this section are used as backends of the Android Virtualization Framework.
Geniezone
- Platforms: Linux, aarch64 only
- Tested upstream: no
- Contacts: fmayle@google.com, smoreland@google.com
Gunyah
- Platforms: Linux, aarch64 only
- Tested upstream: no
- Contacts: quic_eberman@quicinc.com, quic_mnalajal@quicinc.com, fmayle@google.com, smoreland@google.com
Halla
- Platforms: Linux, aarch64 only
- Tested upstream: no
- Contacts: soc.security@samsung.com
Contributing to crosvm
This chapter provides information for those who want to contribute to the crosvm.
- How to contribute - General guideline to contributing to crosvm, including reporting a bug, sending a patch, and updating this documentation.
- Coding Style - Coding style guide for crosvm.
- Style Guide for Platform-Specific Code - Guideline to write platform-specific code cleanly in crosvm.
How to Contribute to crosvm
How to report bugs
We use Google issue tracker. Please use the public crosvm component.
For Googlers: See go/crosvm#filing-bugs.
Contributing code
Gerrit Account
You need to set up a user account with gerrit. Once logged in, you can obtain HTTP Credentials to set up git to upload changes.
Once set up, run ./tools/cl to install the gerrit commit message hook. This will insert a unique
"Change-Id" into all commit messages so gerrit can identify changes. Even warning messages appear,
the message hook will be installed.
Contributor License Agreement
Contributions to this project must be accompanied by a Contributor License Agreement (CLA). You (or your employer) retain the copyright to your contribution; this simply gives us permission to use and redistribute your contributions as part of the project. Head over to https://cla.developers.google.com/ to see your current agreements on file or to sign a new one.
You generally only need to submit a CLA once, so if you've already submitted one (even if it was for a different project), you probably don't need to do it again.
Commit Messages
As for commit messages, we follow ChromeOS's guideline in general.
Here is an example of a good commit message:
devices: vhost: user: vmm: Add Connection type

This abstracts away the cross-platform differences:
cfg(any(target_os = "android", target_os = "linux")) uses a Unix
domain domain stream socket to connect to the vhost-user backend, and
cfg(windows) uses a Tube.

BUG=b:249361790
TEST=tools/presubmit --all

Change-Id: I47651060c2ce3a7e9f850b7ed9af8bd035f82de6
- The first line is a subject that starts with a tag that represents which components your commit
relates to. Tags are usually the name of the crate you modified such as
devices:orbase:. If you only modified a specific component in a crate, you can specify the path to the component as a tag likedevices: vhost: user:. If your commit modified multiple crates, specify the crate where your main change exists. The subject should be no more than 50 characters, including any tags. - The body should consist of a motivation followed by an impact/action. The body text should be wrapped to 72 characters.
BUGlines are used to specify an associated issue number. If the issue is filed at Google's issue tracker, writeBUG=b:<bug number>. If no issue is associated, writeBUG=None. You can have multipleBUGlines.TESTlines are used to describe how you tested your commit in a free form. You can have multipleTESTlines.Change-Idis used to identify your change on Gerrit. It's inserted by the gerrit commit message hook as explained in the previous section. If a new commit is uploaded with the sameChange-Idas an existing CL'sChange-Id, gerrit will recognize the new commit as a new patchset of the existing CL.
Uploading changes
To make changes to crosvm, start your work on a new branch tracking origin/main.
git checkout -b myfeature --track origin/main
After making the necessary changes, and testing them via Presubmit Checks, you can commit and upload them:
git commit
./tools/cl upload
If you need to revise your change, you can amend the existing commit and upload again:
git commit --amend
./tools/cl upload
This will create a new version of the same change in gerrit.
If the branch contains multiple commits, each one will be uploaded as a separate review, and they
will be linked in Gerrit as related changes. You may revise any commit in a branch using tools
like git rebase and then re-upload the whole series with ./tools/cl upload when HEAD is
pointing to the tip of the branch.
Note: We don't accept any pull requests on the GitHub mirror.
Getting Reviews
All submissions needs to be reviewed by one of the crosvm owners. Use the gerrit UI to request a review and add crosvm-reviews@google.com to assign to a random owner.
If you run into issues with reviews, reach out to the team via chat or email list.
For Googlers: see go/crosvm-chat.
Any change to Cargo.lock
When adding a new crate from crates.io, additional review is required to ensure that the crate meets
the crosvm project standards. This review is provided by the members of OWNERS_COUNCIL.
Unfortunately, our tooling cannot tell the difference between adding an external crate and changing
dependencies within crosvm (e.g. devices depending on a new internal crosvm utility crate). For
those cases, a rubberstamp is still needed from OWNERS_COUNCIL.
Reviewers, please check the following document when there is new or updated external dependency.
For Googlers: see go/crosvm/3p_crates.
Reviewing code (for OWNERS)
We have two major types of reviewers on the project:
- Global OWNERS: these folks are broadly responsible for the health of the crosvm project, and have expertise in multiple project subdomains. While they can technically approve any change, they will often delegate to area OWNERS when a change is outside their expertise.
- Area OWNERS: experts in a particular subdomain of the project (e.g. graphics, USB, etc). Major changes in an area SHOULD be reviewed by an area OWNER, if one exists (not all subdomains have OWNERS).
All owners are expected to review code in their areas, and to aim for the following goals in reviews:
- Reply to reviews within 1 working day. If this is infeasible (especially if overloaded), reassign to crosvm-reviews@ to pick another OWNER at random.
- Defer to the styleguide where it makes sense to do so. Update the styleguide when it does not.
- Strive to avoid reviews getting stuck in endless back & forth. If you see this happening, you can:
- Schedule a meeting to discuss it online. Consider inviting another OWNER to help brainstorm solutions.
- Bring the review discussion to the hallway chat to let the group weigh in.
- Follow generally accepted practices for good code review
- Technically: We insist on good documentation, clean APIs especially when broadly consumed, and generally keep code health in mind.
- Socially: Our goal, above all else, is to be good peers to each other. So we review code, not authors. We remember to disagree respectfully, and that a code review is a team effort (author and reviewer) against a hard technical problem.
Submitting code
Crosvm uses a Commit Queue, which will run pre-submit testing on all changes before merging them into crosvm.
Once one of the crosvm owners has voted "Code-Review+2" on your change, you can use the "Submit to CQ" button, which will trigger the test process.
Gerrit will show any test failures. Refer to Building Crosvm for information on how to run the same tests locally.
Each individual change in a patch series must build and pass the tests. If you are working on a series of related changes, ensure that each incremental commit does not cause test regressions or break the build if it is merged without the later changes in the series. For example, an intermediate change must not trigger any unused code warnings or cause test failures that are fixed by later changes in the series.
When all tests pass, your change is merged into origin/main.
Contributing to the documentation
The book of crosvm is built with mdBook. Each markdown file must follow Google Markdown style guide.
To render the book locally, you need to install mdbook, which should be installed when you run
./tools/setup script. Or you can use the tools/dev_container environment.
cd docs/book/
mdbook build
Output is found at docs/book/book/html/.
To format markdown files, run ./tools/fmt in the dev_container.
Coding Style Guide
Philosophy
The following is high level guidance for producing contributions to crosvm.
- Prefer mechanism to policy.
- Use existing protocols when they are adequate, such as virtio.
- Prefer security over code re-use and speed of development.
- Only the version of Rust in use by the ChromeOS toolchain is supported. This is ordinarily the stable version of Rust, but can be behind a version for a few weeks.
- Avoid distribution specific code.
Style guidelines
Prefer single responsibility functions
Functions should have a single responsibility. This helps keep functions short and readable. We prefer this because functions with multiple responsibilities are hard to follow, often suffer from extensive indentation (very short effective line length), and are trickier to test.
When you encounter large/complex functions or are about to add complexity, consider split them into multiple functions. Useful patterns that can help with this include splitting enums into sub-enums, or broader refactoring to split unrelated responsibilities from each other.
Avoid large argument lists
When a function exceeds roughly 6 parameters, this is usually a signal that we should be creating a struct to handle the parameters. More than 6 arguments tends to make call sites unwieldy & hard to read. It could also be a hint that the function has too many responsibilities and should be split up.
Avoid extensive indentation
Sometimes indentation becomes excessive in functions and severely limits the usable line length. Even with editor support, it can be tricky to tell which code is associated with which block. Classic examples of this are function calls that pass lambdas, where the call site is nested inside multiple matches or conditionals. In these cases, try to remove indentation by creating helpers to reset the indentation level, but be thoughtful about whether this makes the situation worse by creating an onion (too many layers / an overly deep stack).
Unsafe code: minimize code under unsafe
Every line of unsafe code can cause memory safety issues. As such, we want to minimize code under
unsafe. Often times we want to have an unsafe function because the caller must satisfy safety
conditions, but we only have one or two actual unsafe lines in the function, along with many safe
lines. In these situations, mark the function unsafe, but apply
#[deny(unsafe_op_in_unsafe_fn)].
This requires us to explicitly mark the unsafe code inside as unsafe rather than allowing any
line in the function to be unsafe.
Unsafe code: write standard safety statements
Rust tooling expects documentation for unsafe code and functions to follow the stdlib's
guidelines. Notably, use
// SAFETY: for unsafe blocks, and always have a # Safety section for unsafe functions in
their doc comment. This helps us comply with
undocumented_unsafe_blocks,
which will eventually be turned on.
Note that not all existing code follows this pattern. // Safe because comments are still common in
the codebase, and should be migrated to the new pattern as they are encountered.
Formatting
To format all code, crosvm defers to rustfmt. In addition, the code adheres to the following
rules:
Each use statement should import a single item, as produced by rustfmt with
imports_granularity=item. Do not use braces to import multiple items.
The use statements for each module should be grouped into blocks separated by whitespace in the
order produced by rustfmt with group_imports=StdExternalCrate and sorted alphabetically:
std- third-party + crosvm crates
crate+super
The import formatting options of rustfmt are currently unstable, so these are not enforced
automatically. If a nightly Rust toolchain is present, it is possible to automatically reformat the
code to match these guidelines by running tools/fmt --nightly.
crosvm uses the remain crate to keep error enums sorted, along
with the #[sorted] attribute to keep their corresponding match statements in the same order.
Unit test code
Unit tests and other highly-specific tests (which may include some small, but not all, integration tests) should be written differently than how non-test code is written. Tests prevent regressions from being committed, show how APIs can be used, and help with understanding bugs in code. That means tests must be clear both now and in the future to a developer with low familiarity of the code under test. They should be understandable by reading from top to bottom without referencing any other code. Towards these goals, tests should:
- To a reasonable extent, be structured as Arrange-Act-Assert.
- Test the minimum number of behaviors in a single test. Make separate tests for separate behavior.
- Avoid helper methods that send critical inputs or assert outputs within the helper itself. It should be easy to read a test and determine the critical inputs/outputs without digging through helper methods. Setup common to many tests is fine to factor out, but lean toward duplicating code if it aids readability.
- Avoid branching statements like conditionals and loops (which can make debugging more difficult).
- Document the reason constants were chosen in the test, including if they were picked arbitrarily such that in the future, changing the value is okay. (This can be done with constant variable names, which is ideal if the value is used more than once, or in a comment.)
- Name tests to describe what is being tested and the expected outcome, for example
test_foo_invalid_bar_returns_baz.
Less-specific tests, such as most integration tests and system tests, are more likely to require obfuscating work behind helper methods. It is still good to strive for clarity and ease of debugging in those tests, but they do not need to follow these guidelines.
Handling technical debt
During development, we don't always have cycles or expertise available to fix problematic patterns or overly complex code. In these situations where we find an existing problem, or are tacking on code to a problematic area, we should document the problem in a bug and add it to the Code Health hotlist. This is where maintainers look to determine what debt most needs attention. The bug should cover:
- Which style guidance is being violated.
- What the impact is (readability, easy to introduce bugs, hard to test, etc)
- Any recommendations for a fix.
Style guide for platform specific code
Code organization
The crosvm code can heavily interleave platform specific code into platform agnostic code using
#[cfg(target_os = "")]. This is difficult to maintain as
- It reduces readability.
- Difficult to write/maintain unit tests.
- Difficult to maintain downstream, proprietary code
To address the above mentioned issue, the style guide provides a way to standardize platform specific code layout.
Consider a following example where we have platform independent code, PrintInner, which is used by
platform specific code, WinPrinter and UnixPrinter to tweak the behavior according to the
underlying platform. The users of this module, sys, get to use an aliased struct called Printer
which exports similar interfaces on both the platforms.
In this scheme print.rs contains platform agnostic logic, structures and traits. Different
platforms, in linux.rs and windows.rs, implement traits defined in print.rs. Finally sys.rs
exports interfaces implemented by platform specific code.
In a more complex library, we may need another layer, print.rs, that uses traits and structures
exported by platform specific code, linux/print.rs and windows/print.rs, and adds some more
common logic to it. Following example illustrates the scheme discussed above. Here,
Printer.print() is supposed to print a value of u32 and print the target os name.
The files that contain platform specific code only should live in a directory named sys/ and
those files should be conditionally imported in sys.rs file. In such a setup, the directory
structure would look like,
$  tree
.
├── print.rs
├── sys
│   ├── linux
│   │   └── print.rs
│   ├── linux.rs
│   ├── windows
│   │   └── print.rs
│   └── windows.rs
└── sys.rs
File: print.rs
#![allow(unused)]
fn main() {
pub struct PrintInner {
    pub value: u32,
}

impl PrintInner {
    pub fn new(value: u32) -> Self {
        Self { value }
    }

    pub fn print(&self) {
        print!("My value:{} ", self.value);
    }
}

// This is useful if you want to
// * Enforce interface consistency or
// * Have more than one compiled-in struct to provide the same api.
//   Say a generic gpu driver and high performance proprietary driver
//   to coexist in the same namespace.
pub trait Print {
    fn print(&self);
}
}
File: sys/windows/print.rs
#![allow(unused)]
fn main() {
use crate::print::{Print, PrintInner};

pub struct WinPrinter {
    inner: PrintInner,
}

impl WinPrinter {
    pub fn new(value: u32) -> Self {
        Self {
            inner: PrintInner::new(value),
        }
    }
}

impl Print for WinPrinter {
    fn print(&self) {
        self.inner.print();
        println!("from win");
    }
}
}
File: sys/linux/print.rs
#![allow(unused)]
fn main() {
use crate::print::{Print, PrintInner};

pub struct LinuxPrinter {
    inner: PrintInner,
}

impl LinuxPrinter {
    pub fn new(value: u32) -> Self {
        Self {
            inner: PrintInner::new(value),
        }
    }
}

impl Print for LinuxPrinter {
    fn print(&self) {
        self.inner.print();
        println!("from linux");
    }
}
}
File: sys.rs
#![allow(unused)]
fn main() {
#[cfg(any(target_os = "android", target_os = "linux"))]
mod linux;

#[cfg(windows)]
mod windows;

mod platform {
    #[cfg(any(target_os = "android", target_os = "linux"))]
    pub use super::linux::LinuxPrinter as Printer;

    #[cfg(windows)]
    pub use super::windows::WinPrinter as Printer;
}

pub use platform::Printer;
}
Imports
When conditionally importing and using modules, use
cfg(any(target_os = "android", target_os = "linux")) and cfg(windows) for describing the
platform. Order imports such that common comes first followed by linux and windows dependencies.
#![allow(unused)]
fn main() {
// All other imports

#[cfg(any(target_os = "android", target_os = "linux"))]
use {
  std::x::y,
  base::a::b::{Foo, Bar},
  etc::Etc,
};

#[cfg(windows)]
use {
  std::d::b,
  base::f::{Foo, Bar},
  etc::{WinEtc as Etc},
};
}
Structure
It is OK to have a few platform specific fields inlined with cfgs. When inlining
- Ensure that all the fields of a particular platform are next to each other.
- Organize common fields first and then platform specific fields ordered by the target os name i.e. "linux" first and "windows" later.
If the structure has a large set of fields that are platform specific, it is more readable to split it into different platform specific structures and have their implementations separate. If necessary, consider defining a crate in platform independent and have the platform specific files implement parts of those traits.
Enum
When enums need to have platform specific variants
- Create a new platform specific enum and move all platform specific variants under the new enum
- Introduce a new variant, which takes a platform specific enum as member, to platform independent enum.
Do
File: sys/linux/base.rs
#![allow(unused)]
fn main() {
enum MyEnumSys {
  Unix1,
}

fn handle_my_enum_impl(e: MyEnumSys) {
  match e {
    Unix1 => {..},
  };
}
}
File: sys/windows/base.rs
#![allow(unused)]
fn main() {
enum MyEnumSys {
  Windows1,
}

fn handle_my_enum_impl(e: MyEnumSys) {
  match e {
    Windows1 => {..},
  };
}
}
File: base.rs
#![allow(unused)]
fn main() {
use sys::MyEnumSys;
enum MyEnum {
  Common1,
  Common2,
  SysVariants(MyEnumSys),
}

fn handle_my_enum(e: MyEnum) {
  match e {
    Common1 => {..},
    Common2 => {..},
    SysVariants(v) => handle_my_enum_impl(v),
  };
}
}
Don't
File: base.rs
#![allow(unused)]
fn main() {
enum MyEnum {
  Common1,
  Common2,
  #[cfg(target_os = "windows")]
  Windows1, // We shouldn't have platform-specific variants in a platform-independent enum.
  #[cfg(any(target_os = "android", target_os = "linux"))]
  Unix1, // We shouldn't have platform-specific variants in a platform-independent enum.
}

fn handle_my_enum(e: MyEnum) {
  match e {
    Common1 => {..},
    Common2 => {..},
    #[cfg(target_os = "windows")]
    Windows1 => {..}, // We shouldn't have platform-specific match arms in a platform-independent code.
    #[cfg(any(target_os = "android", target_os = "linux"))]
    Unix1 => {..}, // We shouldn't have platform-specific match arms in a platform-independent code.
  };
}
}
Exception: dispatch enums (trait-object like enums) should NOT be split
Dispatch enums (enums which are pretending to be trait objects) should NOT be split as shown above. This is because these enums just forward method calls verbatim and don't have any meaningful cross platform code. As such, there is no benefit to splitting the enum. Here is an acceptable example:
#![allow(unused)]
fn main() {
enum MyDispatcher {
  #[cfg(windows)]
  WinType(ImplForWindows),
  #[cfg(unix)]
  UnixType(ImplForUnix),
}

impl MyDispatcher {
  fn foo(&self) {
    match self {
        #[cfg(windows)]
        MyDispatcher::WinType(t) => t.foo(),
        #[cfg(unix)]
        MyDispatcher::UnixType(t) => t.foo(),
    }
  }
}
}
Errors
Inlining all platform specific error values is ok. This is an exception to the enum to keep error handling simple. Organize platform independent errors first and then platform specific errors ordered by the target os name i.e. "linux" first and "windows" later.
Code blocks and functions
If a code block or a function has little platform independent code and the bulk of the code is
platform specific then carve out platform specific code into a function. If the carved out function
does most of what the original function was doing and there is no better name for the new function
then the new function can be named by appending _impl to the functions name.
Do
File: base.rs
#![allow(unused)]
fn main() {
fn my_func() {
  print!("Hello ");
  my_func_impl();
}
}
File: sys/linux/base.rs
#![allow(unused)]
fn main() {
fn my_func_impl() {
  println!("linux");
}
}
File: sys/windows/base.rs
#![allow(unused)]
fn main() {
fn my_func_impl() {
  println!("windows");
}
}
Don't
File: base.rs
#![allow(unused)]
fn main() {
fn my_func() {
  print!("Hello ");

  #[cfg(any(target_os = "android", target_os = "linux"))] {
    println!("linux"); // We shouldn't have platform-specific code in a platform-independent code block.
  }

  #[cfg(target_os = "windows")] {
    println!("windows"); // We shouldn't have platform-specific code in a platform-independent code block.
  }
}
}
match
With an exception to matching enums, see enum, matching for platform specific values can be
done in the wildcard patter(_) arm of the match statement.
Do
File: parse.rs
#![allow(unused)]
fn main() {
fn parse_args(arg: &str) -> Result<()>{
  match arg {
    "path" => {
      <multiple lines of logic>;
      Ok(())
    },
    _ => parse_args_impl(arg),
  }
}
}
File: sys/linux/parse.rs
#![allow(unused)]
fn main() {
fn parse_args_impl(arg: &str) -> Result<()>{
  match arg {
    "fd" => {
      <multiple lines of logic>;
      Ok(())
    },
    _ => Err(ParseError),
  }
}
}
File: sys/windows/parse.rs
#![allow(unused)]
fn main() {
fn parse_args_impl(arg: &str) -> Result<()>{
  match arg {
    "handle" => {
      <multiple lines of logic>;
      Ok(())
    },
    _ => Err(ParseError),
  }
}
}
Don't
File: parse.rs
#![allow(unused)]
fn main() {
fn parse_args(arg: &str) -> Result<()>{
  match arg {
    "path" => Ok(()),
    #[cfg(any(target_os = "android", target_os = "linux"))]
    "fd" => { // We shouldn't have platform-specific match arms in a platform-independent code.
      <multiple lines of logic>;
      Ok(())
    },
    #[cfg(target_os = "windows")]
    "handle" => { // We shouldn't have platform-specific match arms in a platform-independent code.
      <multiple lines of logic>;
      Ok(())
    },
    _ => Err(ParseError),
  }
}
}
Platform specific symbols
If a platform exports symbols that are specific to the platform only and are not exported by all other platforms then those symbols should be made public through a namespace that reflects the name of the platform.
File: sys.rs
#![allow(unused)]
fn main() {
cfg_if::cfg_if! {
    if #[cfg(any(target_os = "android", target_os = "linux"))] {
        pub mod linux;
        use linux as platform;
    } else if #[cfg(windows)] {
        pub mod windows;
        use windows as platform;
    }
}

pub use platform::print;
}
File: linux.rs
#![allow(unused)]
fn main() {
fn print() {
  println!("Hello linux");
}

fn print_u8(val: u8) {
  println!("Unix u8:{}", val);

}
}
File: windows.rs
#![allow(unused)]
fn main() {
fn print() {
  println!("Hello windows");
}

fn print_u16(val: u16) {
  println!("Windows u16:{}", val);

}
}
The user of the library, say mylib, now has to do something like below which makes it explicit that
the functions print_u8 and print_u16 are platform specific.
#![allow(unused)]
fn main() {
use mylib::sys::print;

fn my_print() {
  print();

  #[cfg(any(target_os = "android", target_os = "linux"))]
  mylib::sys::linux::print_u8(1);

  #[cfg(windows)]
  mylib::sys::windows::print_u16(1);
}

}
Onboarding Resources
Various links to useful resources for learning about virtual machines and the technology behind crosvm.
Talks
Chrome University by zachr (2018, 30m)
- Life of a Crostini VM (user click -> terminal opens)
- All those French daemons (Concierge, Maitred, Garcon, Sommelier)
NYULG: Crostini by zachr / reveman (2018, 50m)
- Overlaps Chrome University talk
- More details on wayland / sommelier from reveman
- More details on crostini integration of app icons, files, clipboard
- Lots of demos
Introductory Resources
OS Basics
- OSDev Wiki (A lot of articles on OS development)
- PCI Enumeration (Most of our devices are on PCI, this is how they are found)
- ACPI Source Language Tutorial
Rust
- Rust Cheat Sheet Beautiful website with idiomatic rust examples, overview of pointer- and container types
- Rust Programming Tipz (with a z, that’s how you know it’s cool!)
- Rust design patterns repo
- Organized collection of blog posts on various Rust topics
KVM Virtualization
- Low-level tutorial on how to run code via KVM
- KVM Hello World sample program (host + guest)
- KVM API docs
- Awesome Virtualization (Definitely check out the Hypervisor Development section)
Virtio (device emulation)
- Good overview of virtio architecture from IBM
- Virtio drivers overview by RedHat
- Virtio specs (so exciting, I can’t stop reading)
- Basics of devices in QEMU
VFIO (Device passthrough)
Virtualization History and Basics
- By the end of this section you should be able to answer the following questions
- What problems do VMs solve?
- What is trap-and-emulate?
- Why was the x86 instruction set not “virtualizable” with just trap-and-emulate?
- What is binary translation? Why is it required?
- What is a hypervisor? What is a VMM? What is the difference? (If any)
- What problem does paravirtualization solve?
- What is the virtualization model we use with Crostini?
- What is our hypervisor?
- What is our VMM?
- CMU slides go over motivation, why x86 instruction set wasn’t “virtualizable” and the good old trap-and-emulate
- Why Intel VMX was needed; what does it do (Link)
- What is a VMM and what does it do (Link)
- Building a super simple VMM blog article (Link)
Relevant Specs
Appendix
The following sections contain reference material you may find useful when working on crosvm. Note that some of contents might be outdated.
Sandboxing
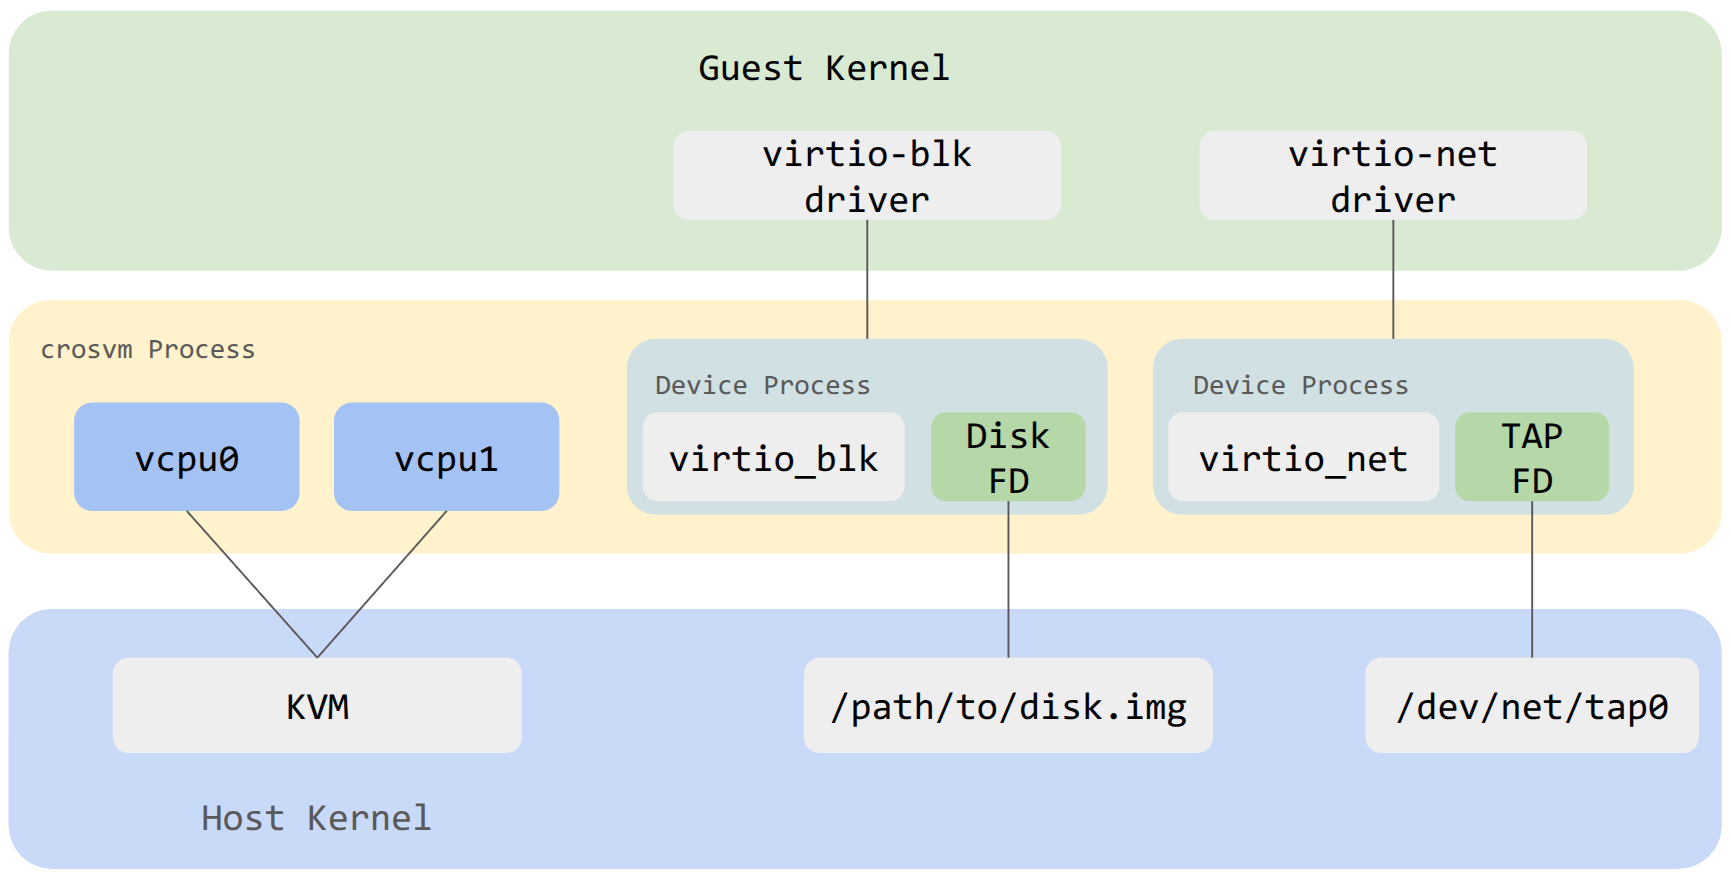
Generally speaking, sandboxing is achieved in crosvm by isolating each virtualized devices into its own process. A process is always somewhat isolated from another by virtue of being in a different address space. Depending on the operating system, crosvm will use additional measures to sandbox the child processes of crosvm by limiting each process to just what it needs to function.
In the example diagram above, the virtio block device exists as a child process of crosvm. It has been limited to having just the FD needed to access the backing file on the host and has no ability to open new files. A similar setup exists for other devices like virtio net.
Seccomp
The seccomp system is used to filter the syscalls that sandboxed processes can use. The form of
seccomp used by crosvm (SECCOMP_SET_MODE_FILTER) allows for a BPF program to be used. To generate
the BPF programs, crosvm uses minijail's policy file format. A policy file is written for each
device per architecture. Each device requires a unique set of syscalls to accomplish their function
and each architecture has slightly different naming for similar syscalls. The ChromeOS docs have a
useful
listing of syscalls.
The seccomp policies are compiled from .policy source files into BPF bytecode by
jail/build.rs
and embedded in the crosvm executable, so it is not necessary to install the seccomp policy files,
only the crosvm binary itself. Be sure to remember to rebuild crosvm after changing a policy file to
observe the updated behavior.
Writing a Policy for crosvm
The detailed rules for naming policy files can be found in jail/seccomp/README.md
Most policy files will include the common_device.policy from a given architecture using this
directive near the top:
@include /usr/share/policy/crosvm/common_device.policy
The common device policy for x86_64 is:
# This is an allow list of syscalls for most of crosvm devices.
#
# Note that some device policy files don't depend on this policy file
# because of some conflicts such as gpu_common.policy.
# If you want to modify policies for all the devices, please modify
# not only this file but also other *_common.policy files.

@frequency ./common_device.frequency
brk: 1
clock_gettime: 1
clone: arg0 & CLONE_THREAD
clone3: 1
close: 1
dup2: 1
dup: 1
epoll_create1: 1
epoll_ctl: 1
epoll_pwait: 1
epoll_wait: 1
eventfd2: 1
exit: 1
exit_group: 1
ftruncate: 1
futex: 1
getcwd: 1
getpid: 1
gettid: 1
gettimeofday: 1
io_uring_setup: 1
io_uring_register: 1
io_uring_enter: 1
kill: 1
lseek: 1
madvise: arg2 == MADV_DONTNEED || arg2 == MADV_DONTDUMP || arg2 == MADV_REMOVE || arg2 == MADV_MERGEABLE || arg2 == MADV_FREE || arg2 == MADV_NOHUGEPAGE
membarrier: 1
memfd_create: 1
mmap: arg2 in ~PROT_EXEC
mprotect: arg2 in ~PROT_EXEC
mremap: 1
munmap: 1
nanosleep: 1
clock_nanosleep: 1
pipe2: 1
poll: 1
ppoll: 1
prctl: arg0 == PR_SET_VMA
prlimit64: 1
read: 1
readlink: 1
readlinkat: 1
readv: 1
recvfrom: 1
recvmsg: 1
restart_syscall: 1
rseq: 1
rt_sigaction: 1
rt_sigprocmask: 1
rt_sigreturn: 1
sched_getaffinity: 1
sched_yield: 1
sendmsg: 1
sendto: 1
set_robust_list: 1
sigaltstack: 1
tgkill: arg2 == SIGABRT
write: 1
writev: 1
fcntl: 1
uname: 1

## Rules for vmm-swap
userfaultfd: 1
# 0xc018aa3f == UFFDIO_API, 0xaa00 == USERFAULTFD_IOC_NEW
ioctl: arg1 == 0xc018aa3f || arg1 == 0xaa00
The syntax is simple: one syscall per line, followed by a colon :, followed by a boolean
expression used to constrain the arguments of the syscall. The simplest expression is 1 which
unconditionally allows the syscall. Only simple expressions work, often to allow or deny specific
flags. A major limitation is that checking the contents of pointers isn't possible using minijail's
policy format. If a syscall is not listed in a policy file, it is not allowed.
Memory Layout
x86-64 guest physical memory map
This is a survey of the existing memory layout for crosvm on x86-64 when booting a Linux kernel. Some of these values are different when booting a BIOS image; see the source. All addresses are in hexadecimal.
| Name/source link | Address | End (exclusive) | Size | Notes |
|---|---|---|---|---|
0000 | A_0000 | 640 KiB | RAM (<1M) | |
MULTIBOOT_INFO_OFFSET | 6000 | 7000 | 4 KiB | Multiboot info structure |
ZERO_PAGE_OFFSET | 7000 | Linux boot_params structure | ||
BOOT_STACK_POINTER | 8000 | Boot SP value | ||
boot_pml4_addr | 9000 | A000 | 4 KiB | Boot page table |
boot_pdpte_addr | A000 | B000 | 4 KiB | Boot page table |
boot_pde_addr | B000 | F000 | 16 KiB | Boot page tables |
CMDLINE_OFFSET | 2_0000 | 2_0800 | 2 KiB | Linux kernel command line |
SETUP_DATA_START | 2_0800 | 9_E800 | 504 KiB | Linux kernel setup_data linked list |
MPTABLE_RANGE | 9_E800 | A_0000 | 6 KiB | MultiProcessor Specification Configuration Table |
ACPI_HI_RSDP_WINDOW_BASE | E_0000 | ACPI tables | ||
mem_1m_to_4g | 10_0000 | D000_0000 | ~3.24 GiB | RAM (<4G) |
KERNEL_START_OFFSET | 20_0000 | Linux kernel image load address | ||
initrd_start | after kernel | Initial RAM disk for Linux kernel (optional) | ||
PROTECTED_VM_FW_START | 7FC0_0000 | 8000_0000 | 4 MiB | pVM firmware (if running a protected VM) |
pci_mmio_before_32bit | D000_0000 | F400_0000 | 576 MiB | Low (<4G) MMIO allocation area |
PCIE_CFG_MMIO_START | F400_0000 | F800_0000 | 64 MiB | PCIe enhanced config (ECAM) |
RESERVED_MEM_SIZE | F800_0000 | 1_0000_0000 | 128 MiB | LAPIC/IOAPIC/HPET/… |
IDENTITY_MAP_ADDR | FEFF_C000 | Identity map segment | ||
TSS_ADDR | FEFF_D000 | Boot task state segment | ||
1_0000_0000 | RAM (>4G) | |||
| (end of RAM) | High (>4G) MMIO allocation area |
aarch64 guest physical memory map
All addresses are IPA in hexadecimal.
Common layout
These apply for all boot modes.
| Name/source link | Address | End (exclusive) | Size | Notes |
|---|---|---|---|---|
SERIAL_ADDR[3] | 2e8 | 2f0 | 8 bytes | Serial port MMIO |
SERIAL_ADDR[1] | 2f8 | 300 | 8 bytes | Serial port MMIO |
SERIAL_ADDR[2] | 3e8 | 3f0 | 8 bytes | Serial port MMIO |
SERIAL_ADDR[0] | 3f8 | 400 | 8 bytes | Serial port MMIO |
AARCH64_RTC_ADDR | 2000 | 3000 | 4 KiB | Real-time clock |
AARCH64_VMWDT_ADDR | 3000 | 4000 | 4 KiB | Watchdog device |
AARCH64_PCI_CAM_BASE_DEFAULT | 1_0000 | 101_0000 | 16 MiB | PCI configuration (CAM) |
AARCH64_VIRTFREQ_BASE | 104_0000 | 105_0000 | 64 KiB | Virtual cpufreq device |
AARCH64_PVTIME_IPA_START | 1ff_0000 | 200_0000 | 64 KiB | Paravirtualized time |
AARCH64_PCI_MEM_BASE_DEFAULT | 200_0000 | 400_0000 | 32 MiB | Low MMIO allocation area |
AARCH64_GIC_CPUI_BASE | 3ffd_0000 | 3fff_0000 | 128 KiB | vGIC |
AARCH64_GIC_DIST_BASE | 3fff_0000 | 4000_0000 | 64 KiB | vGIC |
AARCH64_GIC_ITS_BASE | 4000_0000 | 4002_0000 | 128 KiB | vGIC ITS (if enabled) |
AARCH64_PROTECTED_VM_FW_START | 7fc0_0000 | 8000_0000 | 4 MiB | pVM firmware (if running a protected VM) |
AARCH64_PHYS_MEM_START | 8000_0000 | --mem size | RAM (starts at IPA = 2 GiB) | |
plat_mmio_base | after RAM | +0x800000 | 8 MiB | Platform device MMIO region |
high_mmio_base | after plat_mmio | max phys addr | High MMIO allocation area |
RAM Layout
The RAM layout depends on the --fdt-position setting, which defaults to
start when load using --bios and to end when using --kernel.
In --kernel mode, the initrd is always loaded immediately after the kernel,
with a 16 MiB alignment.
--fdt-position=start
| Name/source link | Address | End (exclusive) | Size | Notes |
|---|---|---|---|---|
fdt_address | 8000_0000 | 8020_0000 | 2 MiB | Flattened device tree in RAM |
payload_address | 8020_0000 | Kernel/BIOS load location in RAM |
--fdt-position=after-payload
| Name/source link | Address | End (exclusive) | Size | Notes |
|---|---|---|---|---|
payload_address | 8000_0000 | Kernel/BIOS load location in RAM | ||
fdt_address | after payload (2 MiB alignment) | 2 MiB | Flattened device tree in RAM |
--fdt-position=end
| Name/source link | Address | End (exclusive) | Size | Notes |
|---|---|---|---|---|
payload_address | 8000_0000 | Kernel/BIOS load location in RAM | ||
fdt_address | before end of RAM (2 MiB alignment) | 2 MiB | Flattened device tree in RAM |
Minijail
On Linux hosts, crosvm uses minijail to sandbox the child devices. The minijail C library is utilized via a Rust wrapper so as not to repeat the intricate sequence of syscalls used to make a secure isolated child process.
The exact configuration of the sandbox varies by device, but they are mostly alike. See
create_base_minijail from jail/src/helpers.rs. The set of security constraints explicitly used
in crosvm are:
- PID Namespace
- Runs as init
- Deny setgroups
- Optional limit the capabilities mask to
0 - User namespace
- Optional uid/gid mapping
- Mount namespace
- Optional pivot into a new root
- Network namespace
- PR_SET_NO_NEW_PRIVS
- seccomp with optional log failure mode
- Limit to number of file descriptors
Package Documentation
The package documentation generated by cargo doc is available
here.